 Honda Accord: Rear Brake Disc Inspection
Runout
1. Raise and support the vehicle (see page 1-13).
2. Remove the rear wheels.
3. Remove the brake pads (see page 19-31), 4. Inspect the brake disc to wheel surface for damage and cracks. Clean the brake disc thoroughly, and remove all rust.
5. Install suitable flat washers (A) and the wheel nuts (B), and tighten the wheel nuts to the specified torque to hold the brake disc securely against the hub.
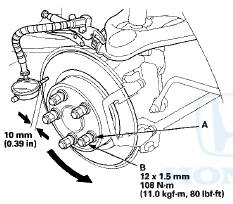
6. Set up the dial gauge against the brake disc as shown, and measure the runout at 10 mm (0.39 in) from the outer edge of the brake disc.
Brake disc runout:
Service limit: 0.04 mm (0.0016 in)
7. If the brake disc is beyond the service limit, refinish the brake disc with a Honda-approved commercially available on-car brake lathe.
Max. refinishing limit: 8.0 mm (0.31 in)
NOTE: - If the brake disc is beyond the service limit for refinishing, replace it (see page 19-34).
- If the brake disc is replaced with a new one, check the new disc for runout. If the new disc is out of specification, refinish the disc.
8. Install the brake pads (see page 19-31).
9. Clean the mating surfaces between the brake disc and the inside of the wheel, then install the rear wheels.
Thickness and Parallelism
1. Raise and support the vehicle (see page 1-13).
2. Remove the rear wheels.
3. Remove the brake pads (see page 19-31).
4. Using a micrometer, measure the brake disc thickness at eight points, about 45 В° apart and 10 mm (0.39 in) in from the outer edge of the brake disc. Replace the brake disc if the smallest measurement is less than the max. refinishing limit.
Brake disc thickness:
Standard: 8.9-9.1 mm (0.35-0.36 in)
Max. refinishing limit: 8.0 mm (0.31 in)
Brake disc parallelism:
0.015 mm (0.0006 in) max.
NOTE: This is the maximum allowable difference between the thickness measurements.
5. If the brake disc is beyond the service limit for parallelism, refinish the brake disc with a Hondaapproved commercially available on-car brake lathe.
NOTE: If the brake disc is beyond the service limit for refinishing, replace it (see page 19-34).
6. Install the brake pads (see page 19-31).
7. Clean the mating surfaces between the brake disc and the inside of the wheel, then install the rear wheels.
 Rear Brake Pad Inspection and Replacement
CAUTION
Frequent inhalation of brake pad dust, regardless of
material composition, could be hazardous to your
health.
- Avoid breathing dust particles.
-Never use an air hose or brush to clea ...
 Rear Brake Disc Replacement
NOTE: Keep any grease off the brake disc and the brake
pads.
1. Raise and support the vehicle (see page 1-13).
2. Remove the rear wheel.
3. Release the parking brake lever fully.
4. Loose ...
See also:
Taking Care of the Unexpected
This section covers the more
common problems that motorists
experience with their vehicles. It
gives you information about how to
safely evaluate the problem and what
to do to correct it. If ...
Synchronized Mode
You can set the temperature synchronously for the driver side and the
passenger
side in synchronized mode.
1. Press the SYNC button.
- The system will switch to the synchronized mode.
...
Shift Lock Solenoid Replacement
Type A Shift Lever
1. Remove the shift lever assembly (see page 14-222).
2. Release the lock tabs (A) retaining the shift lock
solenoid using thin-bladed screwdrivers.
3. Insert a 6.0 mm (0.24 ...