 Honda Accord: Valve, Spring, and Valve Seal Installation
Special Tools Required
Stem Seal Driver, 30 mm 07PAD-0010000
Valve Spring Compressor Attachment 07757-PJ1010A
1. Coat the valve stems with new engine oil. Install the valves in the valve guides.
2. Check that the valves move up and down smoothly.
3. Install the spring seats on the cylinder head.
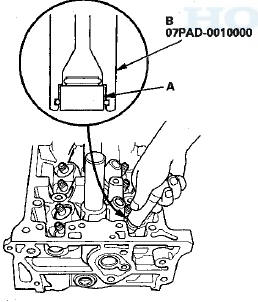
4. Install the new valve seals (A) using the 5.5 mm side of the stem seal driver, 30 mm (B).
NOTE: The exhaust valve seal (C) has a black spring (D), and the intake valve seal (E) has a white spring (F).
They are not interchangeable.

5. Install the valve spring and the spring retainer. Place the end of the valve spring with the closely wound coils toward the cylinder head.
6. Install the valve spring compressor attachment and the valve spring compressor. Compress the spring, and install the valve cotters.
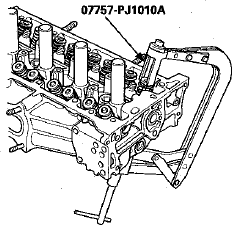
7. Remove the valve spring compressor and the valve spring compressor attachment.
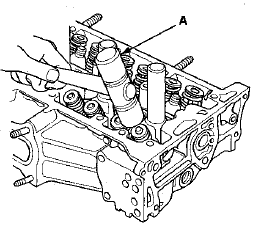
8. Lightly tap the end of each valve stem two or three times with a plastic mallet (A) to ensure proper seating of the valve and the valve cotters. Tap the valve stem only along its axis so you do not bend the stem.
 Valve Seat Reconditioning
1. Inspect the valve stem-to-guide clearance (see page
6-88). If the valve guides are worn, replace them (see
page 6-88) before cutting the valve seats.
2. Renew the valve seats in the cylinder h ...
 Rocker Arm Assemblf Installation
1. Reassemble the rocker arm assembly (see page 6-82).
2. Clean and dry the No. 5 rocker shaft holder mating
surface.
3. Apply liquid gasket P/N 08717-0004, 08718-0003, or
08718-0009 to the cy ...
See also:
Airbag System Components
The front, front side, and side curtain
airbags are deployed according to the
direction and severity of impact. Both side
curtain airbags are deployed in a rollover.
The airbag system inclu ...
ATF Level Check
NOTE:
-Keep all foreign particles out of the transmission.
-Check the ATF level within 60—90 seconds after
turning the engine off.
-Higher ATF level may be indicated if the radiator fan
...
Hood insulator Replacement
For Some Models
NOTE; Take care not to scratch the hood.
1. Detach the clips with a clip remover. Remove the
hood insulator (A) by pulling it away from the hooks
(B).
2. Install the ins ...