 Honda Accord: A/T Clutch Pressure Control Solenoid
Valve A Replacement
Honda Accord: A/T Clutch Pressure Control Solenoid
Valve A Replacement
1. Remove the intake air duct 2. Disconnect the A/T clutch pressure control solenoid valve A connector.
3. Remove the bolts securing the ATF cooler line brackets (B), then remove A/T clutch pressure control solenoid valve A.
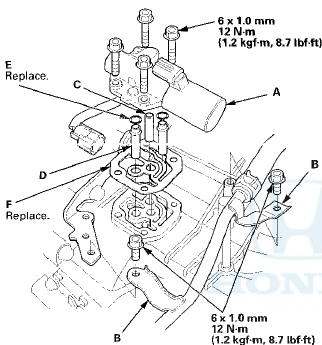
4. Remove the ATF pipe (C), the ATF joint pipes (D), the O-rings (E), and the gasket (F).
5. Clean the mounting surface and the fluid passages of the transmission housing.
6. Install a new gasket on the transmission housing, and install the ATF pipe and the ATF joint pipes. Install new O-rings over the ATF joint pipes.
NOTE: Be sure to install a new gasket with the blue side toward the transmission housing.
7. Install a new A/T clutch pressure control solenoid valve A.
8. Secure the ATF cooler inlet brackets with the bolts.
9. Check the connector for rust, dirt, or oil, and clean or repair if necessary. Then connect the connector securely.
10. Install the intake air duct.
 A/T Clutch Pressure Control Solenoid
Valve A Test
A/T Clutch Pressure Control Solenoid
Valve A Test
1. Connect the HDS to the DLC (A) located under the
driver's side of the dashboard.
2. Turn the ignition switch to ON (II). Make sure the HDS
communicates with the PCM. If it does not, go to the
...
 A/T Clutch Pressure Control Solenoid
Valve B and C Test
A/T Clutch Pressure Control Solenoid
Valve B and C Test
1. Connect the HDS to the DLC (A) located under the
driver's side of the dashboard.
2. Turn the ignition switch to ON (II). Make sure the HDS
communicates with the PCM. If it does not, go to the
...
See also:
Important Safety Precautions
You’ll find many safety
recommendations throughout this
section, and throughout this manual.
The recommendations on this page
are the ones we consider to be the
most important.
Always Wear ...
Front HFL-Navigation-ANC
Microphone
Removal/Installation
NOTE:
• Put on gloves to protect your hands.
• Take care not to scratch the dashboard and related
parts.
• Lay a workshop towel under the parts when working
on them to protect ...
Playing Internet Radio
Connect a compatible phone through Bluetooth®.
You can also connect the phone using your dock connector to the USB port.
Make sure the audio setting is correct for the connection type.
Select ...