 Honda Accord: A/T Clutch Pressure Control Solenoid
Valve A Test
Honda Accord: A/T Clutch Pressure Control Solenoid
Valve A Test
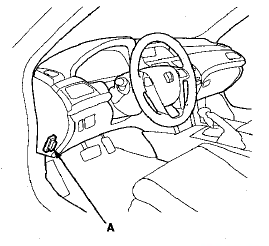
1. Connect the HDS to the DLC (A) located under the driver's side of the dashboard.
2. Turn the ignition switch to ON (II). Make sure the HDS communicates with the PCM. If it does not, go to the DLC circuit troubleshooting (see page 11-181).
3. Select Clutch Pressure Control (Linear) Solenoid Valve A in the Miscellaneous Test Menu on the HDS.
4. Test A/T clutch pressure control solenoid valve A with the HDS.
-If the valve tests OK, the test is complete.
Disconnect the HDS.
-If the valve does not test OK, follow the instructions on the HDS.
-If the valve does not test OK, and the HDS does not determine the cause, go to step 5.
5. Remove the intake air duct.
6. Disconnect the A/T clutch pressure control solenoid valve A connector.
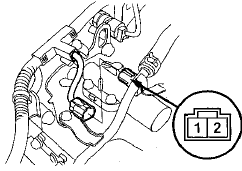
7. Measure the resistance between A/T clutch pressure control solenoid valve A connector terminals No. 1 and No. 2.
Standard: 3—10 
-If the resistance is within the standard, go to step 8.
-If the resistance is out of standard, replace A/T clutch pressure control solenoid valve A (see page 14-184).
8. Connect a jumper wire from the battery negative terminal to A/T clutch pressure control solenoid valve A connector terminal No. 2, and connect another jumper wire from the battery positive terminal to A/T clutch pressure control solenoid valve A connector terminal No. 1.
-If a clicking sound is heard, the valve is OK, and the test is complete, go to step 18.
-If no clicking sound is heard, go to step 9.
9. Remove the bolts securing the ATF cooler line brackets (B), then remove A/T clutch pressure control solenoid valve A.
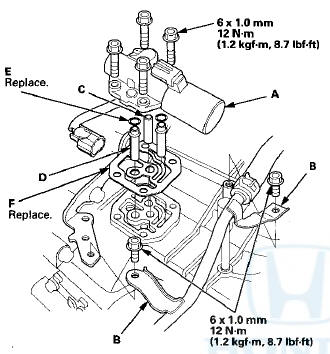
10. Remove the ATF pipe (C), the ATF joint pipes (D), the O-rings (E), and the gasket (F).
11. Check the fluid passage of A/T clutch pressure control solenoid valve A for contamination.
12. Connect a jumper wire from the battery negative terminal to A/T clutch pressure control solenoid valve A connector terminal No. 2, and connect another jumper wire from the battery positive terminal to A/T clutch pressure control solenoid valve A connector terminal No. 1. Make sure A/T clutch pressure control solenoid valve A moves.
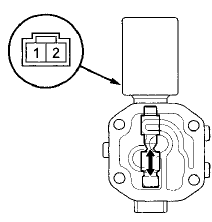
13. Disconnect one of the jumper wires, and check the valve movement at the fluid passage in the valve body mounting surface. If the valve binds or moves sluggishly, or if the solenoid valve does not operate, replace A/T clutch pressure control solenoid valve A.
14. Clean the mounting surface and the fluid passage of the A/T clutch pressure control solenoid valve body and the transmission housing.
15. Install a new gasket on the transmission housing, and install the ATF pipe and the ATF joint pipes. Install new O-rings over the ATF joint pipes.
NOTE: Be sure to install a new gasket with the blue side toward the transmission housing.
16. Install A/T clutch pressure control solenoid valve A.
17. Secure the ATF cooler line brackets with the bolts.
18. Check the connector for rust, dirt, or oil, and clean or repair if necessary. Then connect the connector securely.
19. Install the intake air duct.
 Shift Solenoid Valve Test,
Replacement, and Shift Solenoid
Wire Harness Replacement
Shift Solenoid Valve Test,
Replacement, and Shift Solenoid
Wire Harness Replacement
1. Connect the HDS to the DLC (A) located under the
driver's side of the dashboard.
2. Turn the ignition switch to ON (II). Make sure the HDS
communicates with the PCM. If it does not go to the
...
 A/T Clutch Pressure Control Solenoid
Valve A Replacement
A/T Clutch Pressure Control Solenoid
Valve A Replacement
1. Remove the intake air duct
2. Disconnect the A/T clutch pressure control solenoid
valve A connector.
3. Remove the bolts securing the ATF cooler line
brackets (B), then remove A/T clutch pres ...
See also:
Jump Starting
• Jump Starting Procedure
Turn off the power to electric devices, such as audio and lights. Turn off
the engine,
then open the hood.
1. Connect the first jumper cable to your
vehicle's bat ...
Reverse Idler Gear Removal and
Installation
Removal
1. Remove the bolt (A) securing the reverse idler gear
shaft holder (B).
2. Install a 5 x 0.8 mm bolt (C) in the reverse idler gear
shaft (D), and pull it to remove the reverse idler gea ...
Moonroof
If equipped
The moonroof can be tilted up in the
back for ventilation, or it can be slid
back into the roof. Use the switch on
the front ceiling to operate the
moonroof. You must turn the
...