 Honda Accord: Rear Seat Belt Replacement
Rear Seat Beit
NOTE: • Put on gloves to protect your hands.
• Take care not to tear or damage the seat covers.
• Check the rear seat belts for damage (see page 24-18), and replace them if necessary.
1. Remove the rear seat cushion (see page 20-241).
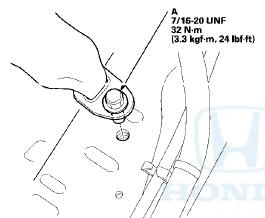
2. Remove the lower anchor bolt (A).
3. Remove these items: • 2-door: - Rear seat-back (see page 20-239)
- C-pillar trim, both sides (see page 20-119)
- Rear shelf (see page 20-128)
- Rear side trim panel (see page 20-127)
• 4 door: - Rear seat side bolsters, both sides (see page 20-242)
- C-pillar trim, both sides (see page 20-123)
- Rear shelf (see page 20-128)
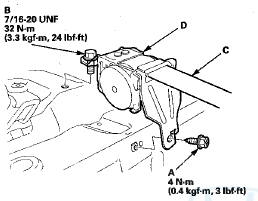
4.2-door: Remove the side curtain airbag mounting bolts (A) and detach the clips (B), then carefully move the side curtain airbag (C) aside to gain access to the retractor bolt (D).
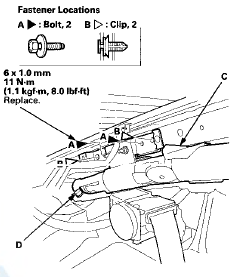
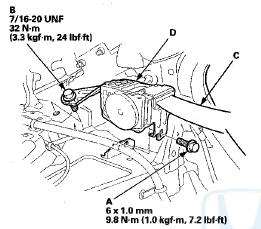
5. Remove the retractor mounting bolt (A) and the retractor bolt (B), then remove the rear seat belt (C) and the retractor (D). 4-door is shown; 2-door is similar.
6. Install the seat belt and the retractor in the reverse order of removal, and note these items: • Apply medium strength liquid thread lock to the lower anchor bolt before reinstallation.
• 2-door: Replace the removed side curtain airbag mounting bolts with new ones.
• Check that the retractor locking mechanism functions (see page 24-18).
• Before installing the anchor bolt, make sure there are no twists or kinks in the seat belt.
Center Seat Belt and Seat Belt Buckles
NOTE: • Put on gloves to protect your hands.
• Take care not to tear or damage the seat covers.
• Check the center seat belts for damage (see page 24-18), and replace them if necessary.
1. Remove the rear seat cushion (see page 20-241).
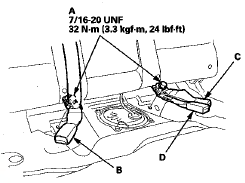
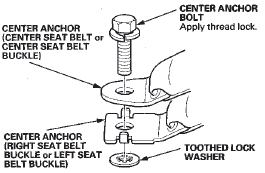
2. Remove the center anchor bolts (A), then remove the right seat belt buckle (B), the center seat belt buckle (C), and the left seat belt buckle (D).
3. Fold down the rear seat-back.
4. Pull out the center seat belt through the slit in the seat belt guide.
5. Remove these items: • 2-door: Rear shelf (see page 20-128).
• 4-door: - Rear seat side bolsters, both sides (see page 20-242).
- C-pillar trim, both sides (see page 20-123).
- Rear shelf (see page 20-128).
6. Remove the retractor mounting tapping screw (A) and the retractor bolt (B), then remove the center seat belt (C) and the retractor (D). 4-door is shown; 2-door is similar.
7. Install the seat belt and the buckles in the reverse order of removal, and note these items: • Apply medium strength liquid thread lock to the center anchor bolts before reinstallation.
• Tighten the bolts by hand first, then tighten to the specified torque.
• Check that the retractor locking mechanism functions (see page 24-18).
• Assemble the washer on the center anchor bolt as shown.
• Before installing the center anchor bolt, make sure there are no twists or kinks in the seat belt.
Center anchor bolt installation
 Front Seat Belt Replacement
Front Seat Belt - 2-door
SRS components are located in this area. Review the
SRS component locations (see page 24-23) and the
precautions and procedures (see page 24-25) before
doing repairs or se ...
 Inspection
Out of Vehicle
For front seat belt retractors with seat belt tensioners,
review the SRS component locations, 2-door (see page
24-23), 4-door (see page 24-21) and the precautions and
procedures (se ...
See also:
Transmission Number
Transmission Type
88E5: 5-speed Manual
M91A: 5-speed Automatic
B90A: 5-speed Automatic
Serial Number
2 0 0 0 0 0 1 M 9 1 A , B90A
8 2 0 0 0 0 1 8 8 E 5 ...
Engine Coolant Check
Look at the coolant level in the
radiator reserve tank. Make sure it is
between the MAX and MIN lines. If
it is below the MIN line, see Adding
Engine Coolant for information on adding ...
Front Passenger's Power Window
Switch Replacement
4-door
1. Carefully remove the front passenger's power
window switch (A).
2. Disconnect the 37P connector (B) from the front
passenger's power window switch.
3. Remove the four screws and th ...