 Honda Accord: Oil Pan Installation
1. Remove all of the old liquid gasket from the oil pan mating surfaces, the bolts, and the bolt holes.
2. Clean and dry the oil pan mating surfaces.
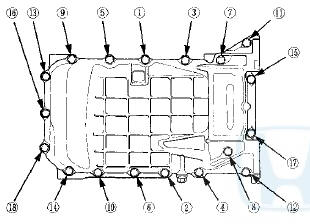
3. Apply liquid gasket, P/N 08717-0004,08718-0003, or 08718-0009 to the engine block mating surface of the oil pan, and to the inside edge of the threaded bolt holes. Install the component within 5 minutes of applying the liquid gasket.
NOTE: - Apply a 3 mm (0.12 in) diamete bead of liquid gasket along the broken line (A).
- If too much time has passed after applying the liquid gasket, remove the old liquid gasket and residue, then reapply new liquid gasket.
4. Install the oil pan.
5. Tighten the bolts in three steps. In the final step, torque all bolts, in sequence, to 12 N-m (1.2 kgf-m, 8.7 Ibfft). Wipe off the excess liquid gasket on the each side of crankshaft pulley and the flywheel/drive plate.
NOTE: - Wait at least 30 minutes before filling the engine with oil.
- Do not run the engine for at least 3 hours after installing the oil pan.
6. Install the clutch/torque converter cover (A) and the transmission mounting bolts (B).
7. If the engine is still in the vehicle, do steps 8 through 24.
8. Lower the transmission jack from the transmission.
9. A/T model: Install the shift cable bracket.
- Vehicles with JHM VINs (see step 34 on page 14-209).
- Vehicles with 1 HG VINs (see step 37 on page 14-210).
10. Tighten the nuts securing the lower transmission mount (see step 24 on page 5-16).
11. Install a new set ring on the end of driveshaft, then install the driveshaft (see page 16-19). Make sure the ring "clicks" into place in the differential.
12. Connect the lower arm to the left side knuckle (see step 5 on page 18-21).
13. Install the left side damper fork (see step 3 on page 18-21).
14. Install the splash shield (see step 47 on page 5-20).
15. Install the left front wheel.
16. Lower the vehicle on the lift.
17. Tighten the upper transmission mount bracket mounting bolts to the specified torque.
MIT model
A/T model
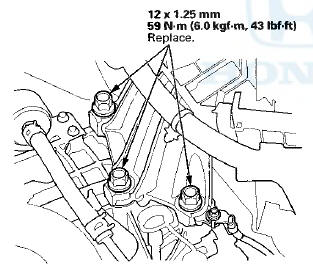
18. Tighten the rear engine mount mounting bolts to the specified torque.
M/T model
19. Tighten the front engine mount bolt (A), then install the front engine mount stop (B).
20. Install the battery base, then install the harness clamps (see step 63 on page 5-22).
21. Install the air cleaner assembly (see page 11-332).
22. Do the battery installation procedure (see page 22-92).
23. Install the strut brace (if equipped) (see page 20-306).
24. Refill the engine with the recommended engine oil (see page 8-10).
 CKP Pulse Plate Replacement
1. Remove the crankshaft from the engine block (see
page 7-14).
2. Remove the CKP pulse plate (A) from the crankshaft.
3. Install the CKP pulse plate in the reverse order of
removal. ...
 Transmission End Crankshaft Oil
Seal Installation - In Car.
Transmission End Crankshaft Oil
Seal Installation - In Car.
Special Tools Required
Driver Handle, 15 x 135L 07749-0010000
Oil Seal Driver Attachment, 96 mm 07ZAD-PNAA100
1 Remove the transmission:
- Manual transmission (see page 13-7)
- Automatic transmis ...
See also:
General Troubleshooting Information
System Indicator
The TPMS (tire pressure monitoring system) has the low
tire pressure indicator and the TPMS indicator.
The Low Tire Pressure Indicator
- If the system detects low pressure in an ...
Exhaust Pipe and Muffler Replacement
NOTE: Use new gaskets and self-locking nuts when reassembling.
...
Driving Position Memory System*
You can store two driver’s seat positions with the driving position memory
system.
When you unlock and open the driver’s door with a remote, the seat adjusts
automatically to one of the two ...