 Honda Accord: Transmission End Crankshaft Oil
Seal Installation - In Car.
Honda Accord: Transmission End Crankshaft Oil
Seal Installation - In Car.
Special Tools Required
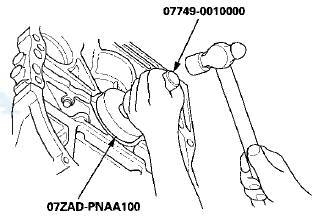
Driver Handle, 15 x 135L 07749-0010000
Oil Seal Driver Attachment, 96 mm 07ZAD-PNAA100
1 Remove the transmission: - Manual transmission (see page 13-7) - Automatic transmission (see page 14-194) 2. M/T model: Remove the flywheel (see step 17 on page 12-18), the clutch disc (see step 8 on page 12-16), and the pressure plate (see step 3 on page 12-15).
3. A/T model: Remove the drive plate (see page 14-204).
4. Clean and dry the crankshaft oil seal housing.
5. Apply a light coat of new engine oil to the lip of the crankshaft oil seal.
6. Use the driver handle, 15 x 135L and the oil seal driver attachment 96 mm to drive a new crankshaft oil seal squarely into the engine block to the specified installed height.
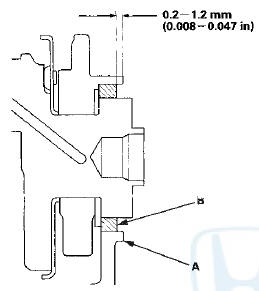
7. Measure the distance between the engine block (A)
and the crankshaft oil seal (B).
Oil Seal Installed Height: 0.2-1.2 mm
(0.008-0.047 In)
8. M/T model: Install the flywheel (see step 18 on page 12-18), the clutch disc (see step 26 on page 12-19), and the pressure plate (see step 27 on page 12-19).
9. A/T model: Install the drive plate (see page 14-204).
10. Install the transmission: - Manual transmission (see page 13-15) - Automatic transmission (see page 14-205)
 Oil Pan Installation
1. Remove all of the old liquid gasket from the oil pan
mating surfaces, the bolts, and the bolt holes.
2. Clean and dry the oil pan mating surfaces.
3. Apply liquid gasket, P/N 08717-0004,0871 ...
 Sealing Bolt Installation
NOTE: When installing the sealing bolt (A), always use a
new washer.
...
See also:
Clutch Wave-plate Phase Difference
Inspection
1. Place the clutch wave-plate (A) on a surface plate, and
set a dial indicator (B) on the wave-plate.
2. Find the bottom (C) of a phase difference of the
wave-plate, zero the dial indicator an ...
Adjust the Head Restraints
Adjust the driver’s head restraint so
the center of the back of your head
rests against the center of the
restraint.
Have passengers adjust their head
restraints properly as well. Taller ...
Trunk Light Test/Replacement
1. Open the trunk lid.
2. Carefully pry out the trunk light (A).
Trunk Light: 5 W
3. Disconnect the 2P connector (B) from the trunk light.
4. Check for continuity between terminals No. 1 ( + ...