 Honda Accord: Navigation Unit
Removal/Installation
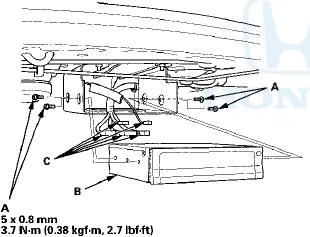
Honda Accord: Navigation Unit
Removal/Installation
NOTE: • Before you replace the navigation unit, back-up the customer data using system diagnostic mode Save Users Memory under the Functional Set up (see page 23-186).
• Ifthe navigation unit is replaced or disconnected, a Map Matching must be done (see page 23-133).
1. Turn the ignition switch to ON (II).
2. Eject the DVD from the original navigation unit (see page 23-237). To avoid scratching or damaging the DVD, temporarily place the DVD in a jewel case.
NOTE: If the DVD does not eject, refer to symptom troubleshooting Navigation unit does not eject or accept the navigation DVD.
3. Turn the ignition switch to LOCK (0).
4. Remove the four bolts (A) from the navigation unit (B).

7. Turn the ignition switch to ON (II), then reinstall the customer's original navigation DVD, verifying that the DVD is free of scratches or smudges.
8. Check any official Honda service website for more service information about patches for the navigation system. Apply any prescribed patches to the new navigation unit.
NOTE: Simply transferring the navigation DVD from the original navigation unit to the new navigation unit does not assure the correct software for the vehicle will be loaded into the new navigation unit. Doing the navigation DVD transfer without doing software patches may cause the new navigation unit to appear to be malfunctioning.
9. Enter the new navigation anti-theft code.
10. Park the vehicle outside, and do the GPS initialization (see page 23-132).
11. Give the new navigation anti-theft code to the customer.
 DVD-ROM Replacement
NOTE:
• Check any official Honda service website for more
service information about the navigation system and
software updates.
• Do not replace the DVD to give a customer a preview
o ...
 Navigation Display Unit
Removal/Installation
Navigation Display Unit
Removal/Installation
1 Remove the audio unit (see page 23-114), then
remove the center display visor (see page 20-171).
2. Remove the screws and bolts (A), then pull out the
navigation display unit (B).
3. Install ...
See also:
DTC Troubleshooting
DTC 11,13,15,17: Tire Low Air Pressure
NOTE: If low tire pressure is detected, the TPMS control
unit sets one or more of these DTCs, and turns on the
low tire pressure indicator. If the low tire pr ...
Headlight Aiming
The headlights were properly aimed
when your vehicle was new. If you
regularly carry heavy items in the
trunk or pull a trailer, readjustment
may be required. Adjustments
should be done by y ...