 Honda Accord: Navigation Display Unit
Removal/Installation
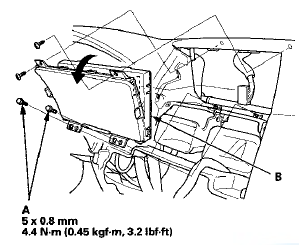
1 Remove the audio unit (see page 23-114), then remove the center display visor (see page 20-171).
2. Remove the screws and bolts (A), then pull out the navigation display unit (B).

3. Install the unit in the reverse order of removal. Be careful not to drop the forward screw behind the dashboard.
 Navigation Unit
Removal/Installation
NOTE:
• Before you replace the navigation unit, back-up the
customer data using system diagnostic mode Save
Users Memory under the Functional Set up (see page
23-186).
• Ifthe navigat ...
 Interface Dial
Removal/Installation
1. Remove the audio unit (see page 23-114).
2. Remove the screw and harness cover (A).
3. Disconnect the interface dial connector (A). Remove
the screws and interface dial (B).
NOTE: If the ...
See also:
Clutch Interlock Switch T e s t
M/T model
1. Disconnect the clutch interlock switch connector (A).
2. Remove the clutch interlock switch (B).
3. Check for continuity between the terminals according
to the table.
- If the ...
Automatic Climate Control Sensors
The automatic climate control system is
equipped with a sunlight sensor and an
interior temperature sensor. Do not cover or
spill any liquid on them.
...
Transmitter Test
NOTE:
• If the doors unlock or lock with the
transmitter, but the
LED on the transmitter does not come on, the LED is
faulty; replace the transmitter.
• If any door is open, you cann ...
