 Honda Accord: Mainshaft Bearing and Oil Seal Replacement
Special Tools Required
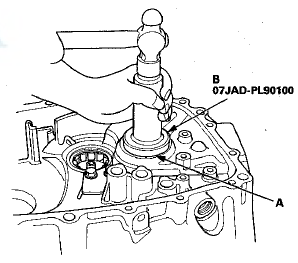
- Oil Seal Driver, 65 07JAD-PL90100
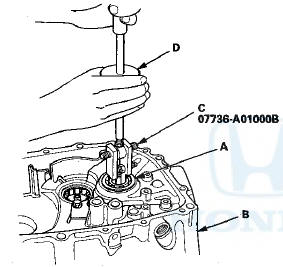
- Adjustable Bearing Puller, 20-”40 mm 07736-A01000B
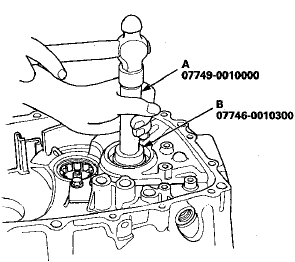
- Bearing Driver Attachment, 42 x 47 07746-0010300
- Driver Handle, 15 x 135L 07749-0010000
- Slide Hammer 3/8"-16 UNF, commercially available
1. Remove the ball bearing (A) from the clutch housing (B) using the 20-”40 mm adjustable bearing puller (C) and a commercially available 3/8"-16 UNF slide hammer (D).
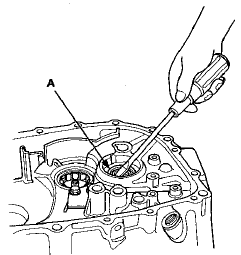
2. Remove the oil seal (A) from the clutch housing. Be careful not to damage the clutch housing when removing the oil seal.
3. Drive in a new oil seal from the transmission side using the 15 x 135L driver handle (A) and the 42 x 47 bearing driver attachment (B).
4. Drive in a new ball bearing (A) from the transmission side using the 65 oil seal driver (B).
 Synchro Ring and Gear Inspection
1. Inspect the synchro rings for scoring, cracks, and
damage (A).
Example of synchro ring teeth
2. Inspect the inside of each synchro ring (B) for wear.
Inspect the ...
 Countershaft Bearing Replacement
Special Tools Required
- Oil Seal Driver, 65 07JAD-PL90100
- Adjustable Bearing Puller, 20-”40 mm 07736-A01000B
- Slide Hammer 3/8"-16 UNF, commercially available
1. Remove the bearing ...
See also:
How Your Side Airbags Work
If you ever have a moderate to
severe side impact, sensors will
detect rapid acceleration and signal
the control unit to instantly inflate
either the driver’s or the passenger’s
side a ...
Playing Bluetooth® Audio
Your audio system allows you to listen to music from your
Bluetooth®-compatible
phone.
This function is available when the phone is paired and connected to the
vehicle's
Bluetooth® HandsFre ...
HVAC Control Power and Ground
Circuit Troubleshooting
1. Check the No. 16 (7.5 A) fuse in the driver's
under-dash fuse/ relay box.
Is the fuse OK?
YES-Go to step 2.
NO-Replace the fuse, and recheck. If the fuse blows
again, check for a short in ...