 Honda Accord: Synchro Ring and Gear Inspection
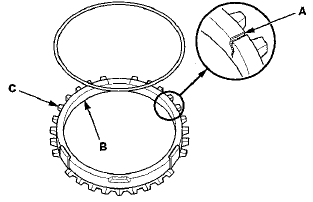
1. Inspect the synchro rings for scoring, cracks, and damage (A).
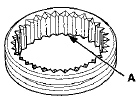
Example of synchro ring teeth


2. Inspect the inside of each synchro ring (B) for wear.
Inspect the teeth (C) on each synchro ring for wear (rounded off).
3. Inspect the teeth (A) on each synchro sleeve and matching teeth on each gear for wear (rounded off).
Example of synchro s l e e v e teeth and gear teeth


4. Inspect the synchro teeth on gear for scoring, cracks, and damage (A).
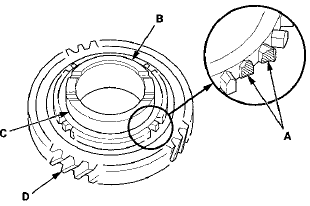
5. Inspect the thrust surface (B) on each gear hub for wear.
6. Inspect the cone surface (C) on each gear hub for wear and roughness.
7. Inspect the teeth on all gears (D) for uneven wear, scoring, and cracks.
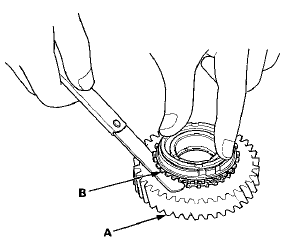
8. Coat the cone surface of each gear with MTF, and place its synchro ring on it. Rotate the synchro ring, making sure that it does not slip.
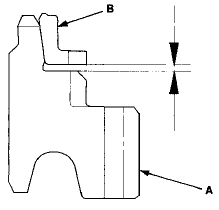
9. Measure the clearance between each gear (A) and its synchro ring (B) all around the gear. Hold the synchro ring against the gear evenly while measuring the clearance. If the clearance is less than the service limit replace the synchro ring and gear.
Synchro Ring-to-Gear Clearance
Standard: 0.70-1.49 mm (0.028-0.059 in)
Service Limit: 0.4 mm (0.02 in)
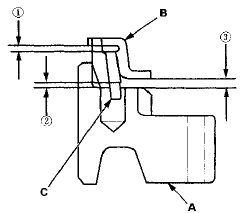
Double Cone Synchro and Triple Cone
Synchro-to-Gear Clearance
Standard:
 : Outer Synchro Ring (B) to
Synchro Cone (C)
Double Cone Synchro (3rd gear)
0.46-0.97 mm (0.018-0.038 in)
Double Cone Synchro (4th gear)
0.70-1.19 mm (0.028-0.047 in)
Triple Cone Synchro
0.70-1.19 mm (0.028-0.047 in)
 : Synchro Cone (C) to Gear
(A)
Double Cone Synchro (3rd gear)
0.51-1.07 mm (0.020-0.042 in)
Double Cone Synchro (4th gear)
0.50-1.04 mm (0.020-0.041 in)
Triple Cone Synchro
0.50-1.04 mm (0.020-0.041 i n)
 :
:
Outer Synchro Ring
(B) to Gear (A)
0.95-1.68 mm (0.037-0.066 in)
Service Limit:
: 0.3 mm (0.01 in)
: 0.3 mm (0.01 in)
: 0.6 mm (0.02 in)
Synchro ring-to-gear
Double cone synchro and triple cone synchro-to-gear
 Synchro Sleeve and Hub Inspection and
Reassembly
Synchro Sleeve and Hub Inspection and
Reassembly
1. Inspect the gear teeth on all synchro hubs and
synchro sleeves for wear (rounded off corners).
2. Install each synchro hub (A) in its mating synchro
sleeve (B), and check for free movement. Ma ...
 Mainshaft Bearing and Oil Seal Replacement
Special Tools Required
- Oil Seal Driver, 65 07JAD-PL90100
- Adjustable Bearing Puller, 20-”40 mm 07736-A01000B
- Bearing Driver Attachment, 42 x 47 07746-0010300
- Driver Handle, 15 x 135L ...
See also:
VTC Actuator, Exhaust Camshaft
Sprocket Replacement
Removal
1. Remove the cam chain (see page 6-62).
2. Hold the camshaft with an open-end wrench, then
loosen the variable valve timing control (VTC)
actuator mounting bolt and the exhaust camshaft ...
General Troubleshooting Information
Sf stem Indicator
This system has four indicators;
- ABS indicator (A)
- Brake system indicator (B)
- VSA indicator (C)
- VSA activation indicator (D)
When the system is OK, each indicator com ...
Interior Light Switch
Test/Replacement
With moonroof
NOTE: The Interior light switch is built into the moonroof
switch, and it switches the front individual map light OFF
and DOOR positions.
1. Remove the front individual map lights ...