 Honda Accord: Front Grille Cover Replacement
2-door
NOTE: - Take care not to scratch the front grille or the body.
- When prying with a flat-tip screwdriver, wrap it with protective tape to prevent damage.
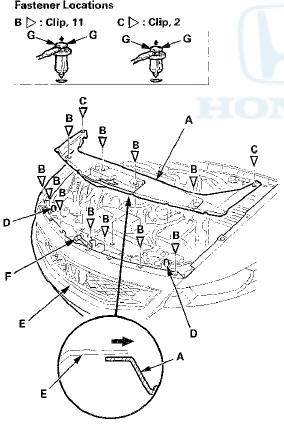
1. Remove the front grille cover (A).
-1. Detach the clips (B, C).
-2. Pass both hood edge cushions (D) through the holes in the cover by pulling up the rear edge of the cover, and slide the entire cover rearward to release the front edge of it from under the front grille (E).
-3. Pass the hood latch handle (F) through the hole in the cover.
NOTE: To release the clips, pry u p on the center p in at the notch (G).
2. Install the cover in the reverse order of removal, and note these items: - If the clips are damaged or stress-whitened, replace them with new ones.
- Push the clips into place securely.
4-door
NOTE: - Take care not to scratch the front grille or the body.
- When prying with a flat-tip screwdriver, wrap it with protective tape to prevent damage.
1. Remove the front grille cover (A).
-1. Detach the clips (B, C).
-2. Release the hooks (D) from both front fender trims (E).
-3. Pass both hood edge cushions (F) through the holes in the cover by pulling up the rear edge of the cover, and slide the entire cover rearward to release it from the groove (G) of the front grille (H).
-4. Pass the hood latch handle (I) t h r o u g h the h o l e in the cover.
2. Install the cover in the reverse order of removal, and note these items: - If the clips are damaged or stress-whitened, replace them with new ones.
- Push the clips and the hooks into place securely
 Exterior Trim
...
 Front Grille Replacement
Special Tools Required
KTC Trim Tool Set SOJATP2014*
* Available through the Honda Tool and
Equipment
Program; call 888-424-6857
Grille Replacement - 2-door
NOTE:
- Take care not to scratch th ...
See also:
Side Impact Sensor (Second) Replacement
4-Door
Removal
1. Do t h e b a t t e r y t e r m i n a l d i s c o n n e c t i o n procedure
(see
page 22-91), t h e n w a i t at least 3 m i n u t e s before
s t a r t i ng work.
2. Remove t ...
If the Low Tire Pressure/TPMS IndicatorComes On or Blinks
• Reasons for the indicator to come on or blink
A tire pressure is significantly low, or the TPMS has not been calibrated.
If there is a problem with the TPMS or the compact spare tire is inst ...
Transmission Number
Transmission Type
88E5: 5-speed Manual
M91 A: 5-speed Automatic
B90A: 5-speed Automatic
Serial Number
1000001-: M91A, B90A
8000001-: 88E5 ...