 Honda Accord: Front Grille Replacement
Special Tools Required
KTC Trim Tool Set SOJATP2014*
* Available through the Honda Tool and Equipment Program; call 888-424-6857
Grille Replacement - 2-door
NOTE: - Take care not to scratch the front bumper, - When prying with a flat-tip screwdriver, wrap it with protective tape to prevent damage.
1. Remove the front bumper (see page 20-255).
2. Remove the front grille (A).
-1. Detach the clips.
-2. Release the hooks (B) and the ribs (C) from the front bumper (D).
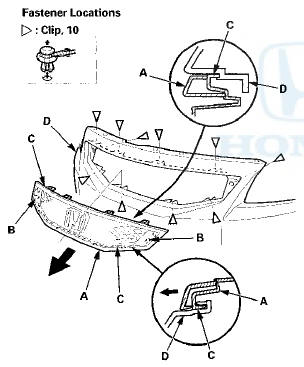
3. Install the grille in the reverse order of removal, and note these items: - If the clips are damaged or stress-whitened, replace them with new ones.
- Push the clips and the hooks into place securely.
Grille Replacement - 4-door
NOTE: - Take care not to scratch the front bumper or the body.
When prying with a flat-tip screwdriver, wrap it with protective tape to prevent damage.
1. Remove the front grille cover (see page 20-274).
2. Remove the front grille (A).
-1. Detach the clips.
-2. Release the hooks (B) and the ribs (C) from the front bumper (D).
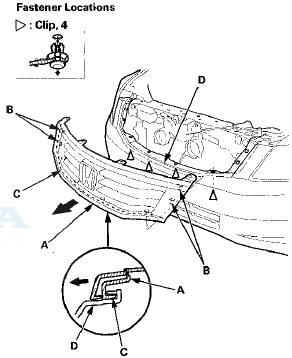
3. Install the grille in the reverse order of removal, and note these items: - If the clips are damaged or stress-whitened, replace . them with new ones.
- Push the clips and the hooks into place securely.
Molding Replacement - 2-door
NOTE; - Take care not to scratch the front grille.
- When prying with a flat-tip screwdriver, wrap it with protective tape to prevent damage.
1. Remove the front grille.
2. Remove the screws, and release the two hooks (A) with a flat-tip screwdriver, then remove the front grille molding (B) from the front grille base (C).
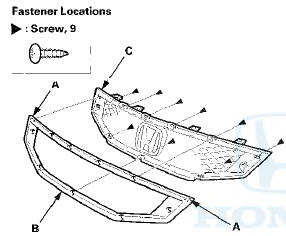
3. Install the molding in the reverse order of removal, and push the hooks into place securely.
Molding Replacement - 4-door
NOTE: - Take care not to scratch the front grille.
- When prying with a flat-tip screwdriver, wrap it with protective tape to prevent damage.
1. Remove the front grille.
2. Remove the screw, and release the hooks (22 places) (A) with a flat-tip screwdriver, then remove the front grille molding (B) from the front grille base (C).
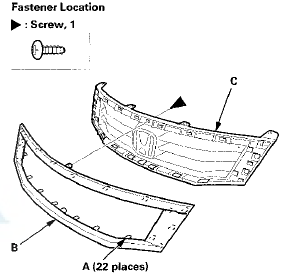
3. Install the molding in the reverse order of removal, and push the hooks into place securely.
 Front Grille Cover Replacement
2-door
NOTE:
- Take care not to scratch the front grille or the body.
- When prying with a flat-tip screwdriver, wrap it with
protective tape to prevent damage.
1. Remove the front grille cov ...
 Front Fender Trim Replacement
2-door
NOTE:
- Take care not to scratch the front grille cover or the
body.
- When prying with a flat-tip screwdriver, wrap it with
protective tape to prevent damage.
- The left side is show ...
See also:
Driver's Outer Middle Pad
Removal/Installation
Special Tools Required
KTC Trim Tool Set SOJATP2014*
*Available through the Honda Tool and
Equipment
Program; call 888-424-6857
NOTE:
- Take care not to scratch the dashboard or the related
pa ...
Features
This chapter describes how to operate technology features. ...
Playing a USB Flash Drive
Your audio system reads and plays sound files on a USB flash drive in either
MP3,
WMA or AAC*1 format.
Connect your USB flash drive to the USB port, then select the USB mode.
• How to Sele ...