 Honda Accord: Front Fender Trim Replacement
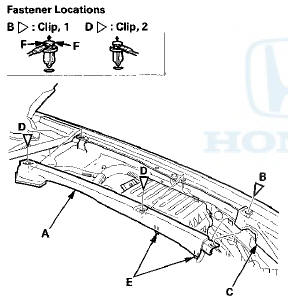
2-door
NOTE: - Take care not to scratch the front grille cover or the body.
- When prying with a flat-tip screwdriver, wrap it with protective tape to prevent damage.
- The left side is shown; the right side is similar.
1. Remove the front fender trim (A).
-1. Detach the clip (B) from the front grille cover (C).
-2. Detach the clips (D) securing the trim.
-3. Pull up the trim to release the projections (E) from the holes in the body, and pull out the trim from under the front grille cover.
NOTE: To release the clip B, pry up on the center pin at the notch (F).
2. Install the trim in the reverse order of removal, and note these items: - If the clips are damaged or stress-whitened, replace them with new ones.
- Push the clips into place securely.
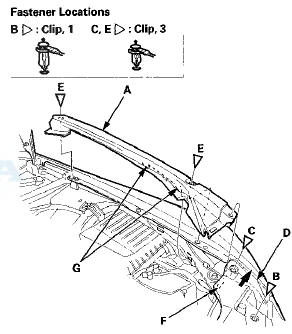
4-door
NOTE: - Take care not to scratch the front grille cover or the body.
- When prying with a flat-tip screwdriver, wrap it with protective tape to prevent damage.
- The left side is shown; the right side is similar.
1 Remove the front fender trim (A).
-1. Detach the clips (B, C) from the front grille cover (D).
-2. Detach the clips (E) securing the trim.
-3. Pull up the front grille cover to release the hook (F) from the front fender cover.
-4. Pull up the trim to release the projections (G) from the holes in the body.
2. Install the trim in the reverse order of removal, and note these items: - If the clips are damaged or stress-whitened, replace them with new ones.
- Push the clips and the hook into place securely.
 Front Grille Replacement
Special Tools Required
KTC Trim Tool Set SOJATP2014*
* Available through the Honda Tool and
Equipment
Program; call 888-424-6857
Grille Replacement - 2-door
NOTE:
- Take care not to scratch th ...
 Cowl Cover Replacement
Special Tools Required
KTC Trim Tool Set SOJATP2014*
*Available through the Honda Tool and
Equipment
Program; call 888-424-6857
Cowl Cover Replacement
NOTE:
- Put on gloves to protect your han ...
See also:
Rear Door Sash Outer Trim
Replacement
4-door
NOTE: Take care not to scratch the door.
1. Remove the door outer molding (see page 20-54).
2. Pull up the door sash outer trim (A) to release the trim
from the clips, and release the t ...
Oil Pressure Switch Test
1 Disconnect the oil pressure switch connector (A) from
the oil pressure switch (B).
2. Check for continuity between the oil pressure switch
terminal and the engine (ground). There should be
con ...
Rearview Mirror Harness Cover Base
Replacement
4-door with Automatic Dimming Rearview
Mirror
NOTE:
t Put on gloves to protect your hands.
- Wear eye protection while cutting the glass adhesive
with piano wire.
1. Remove these items:
- R ...