 Honda Accord: Glove Box Removal/Installation
Special Tools Required
KTC Trim Tool Set SOJATP2014*
*Available through the Honda Tool and Equipment Program; call 888-424-6857
SRS components are located in this area. Review the SRS component locations, 2-door (see page 24-23), 4-door (see page 24-21) and the precautions and procedures (see page 24-25) before doing repairs or service.
NOTE: - Take care not to scratch the dashboard or the related parts.
- Use the appropriate tool from the KTC trim tool set to avoid damage when removing components.
1. Open the glove box.
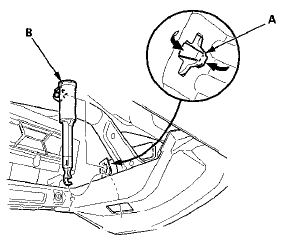
2. Disconnect the glove box damper (A) from the pivot (B) on the glove box.
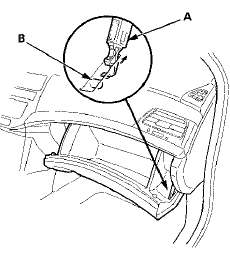
3. Close the glove box.
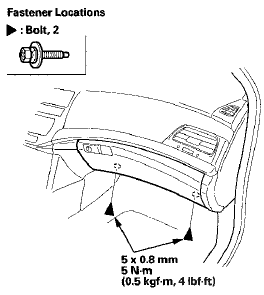
4. Remove the bolts.
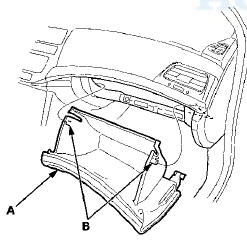
5. While holding the glove box (A), release the glove box stop (B) on each side from the dashboard by pushing them in, then remove the glove box.
NOTE: If you only removing the glove box, go to step 8. If you remove the glove box damper, continue to step 6.
Glove box damper removal
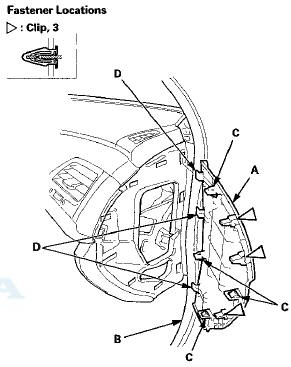
6. Open the front door, and remove the passenger's dashboard side panel (A).
-1. Pull out the front door opening seal (B) as needed.
-2. Gently pry the rear edge of the panel with the appropriate trim tool to detach the clips and release the hooks (C).
-3. Release the hooks (D).
7. From the dashboard side panel opening, detach the clip (A), then remove the g l o v e box damper (B).
8. Install the glove box in the reverse order of removal, and note these items: - If the dashboard side panel clips are damaged or stress-whitened, replace them with new ones.
- Push the clips and the hooks into place securely.
 Glove Box Lock Cylinder Replacement
NOTE: Take care not to scratch the glove box.
1. Remove the glove box (see page 20-174).
2. While lifting the glove box handle (A), pull out one
end of the retainer (B) with a hook-shaped tool ...
 Glove Box Striker Replacement
SRS components are located in this area. Review the
SRS component locations, 2-door {see page 24-23),
4-door (see page 24-21) and the precautions and
procedures (see page 24-25) before doing repair ...
See also:
Information Display
When there is an incoming call, or
HFL is in use, ‘‘HANDSFREELINK’’
will appear on the display.
‘‘ ’’ indicator will be
displayed on
the audio display when a phone is
lin ...
Restraints
Special Tools
...
PCV Valve Inspection
1. Check the PCV valve (A), hoses (B), and connections
for leaks or restrictions.
1.PCV valve when the hose between the PCV valve and
intake manifold is lightly pinched (A) with your fingers
or ...