 Honda Accord: Glove Box Striker Replacement
SRS components are located in this area. Review the SRS component locations, 2-door {see page 24-23), 4-door (see page 24-21) and the precautions and procedures (see page 24-25) before doing repairs or service.
NOTE: Take care not to scratch the dashboard or the related parts.
1. Disconnect the glove box damper from the pivot on the glove box (see step 2 on page 20-174).
2. While holding the glove box, release the glove box stop on each side from the dashboard by pushing them inside (see step 5 on page 20-175).
3. Remove the screws, then remove the glove box striker (A).
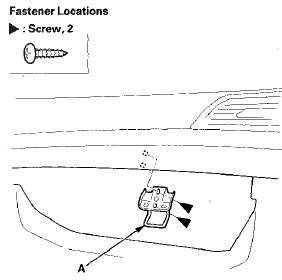
4. Install the striker in the reverse order of removal.
 Glove Box Removal/Installation
Special Tools Required
KTC Trim Tool Set SOJATP2014*
*Available through the Honda Tool and Equipment
Program; call 888-424-6857
SRS components are located in this area. Review the
SRS component l ...
 Dashboard Side Vent
Removal/Installation
Dashboard Side Vent
Removal/Installation
Special Tools Required
KTC Trim Tool Set SOJATP2014*
* Available through the Honda Tool and
Equipment
Program; call 888-424-6857
NOTE;
- Take care not to scratch the dashboard or the related
p ...
See also:
Rear Door Sash Outer Trim
Replacement
4-door
NOTE: Take care not to scratch the door.
1. Remove the door outer molding (see page 20-54).
2. Pull up the door sash outer trim (A) to release the trim
from the clips, and release the t ...
Automatic Transmission and A/T Differential (cont'd)
...
Semi-automatic Operation
You can manually select various
functions of the climate control
system when it is in fully automatic
mode. All other features remain
automatically controlled. Making any
manual selection ca ...