 Honda Accord: Gauge Control Module Input Test
NOTE: Before testing, do the gauge control module self-diagnosis function (see page 22-332), and make sure the B-CAN communication lines are OK.
1. Turn the ignition switch to LOCK (0).
2. Remove the gauge control module (see page 22-351), and disconnect the 32P connector (A) from it
GAUGE CONTROL MODULE 32P CONNECTOR
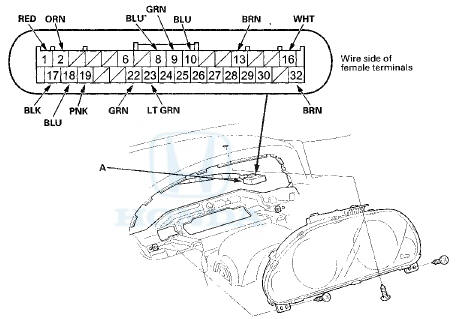
*: Canada models
3. Inspect the connector and socket terminals to be sure they are all making good contact.
• If the terminals are bent, loose or corroded, repair them as necessary, and recheck the system.
• If the terminals are OK, go to step 4.
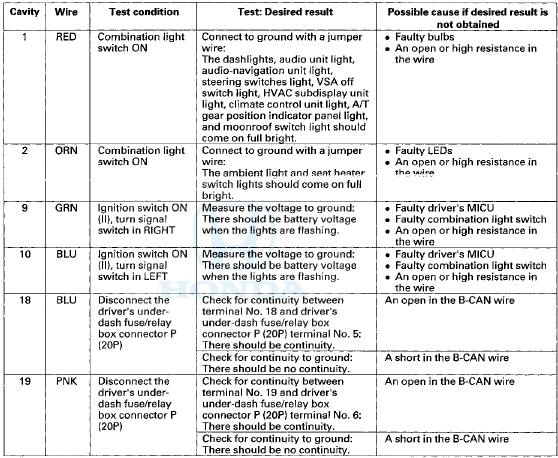
4. With the connector still disconnected, do these input tests at the following connector.
• If any test indicates a problem, find and correct the cause, then recheck the system.
• If all the input tests prove OK, go to step 5.
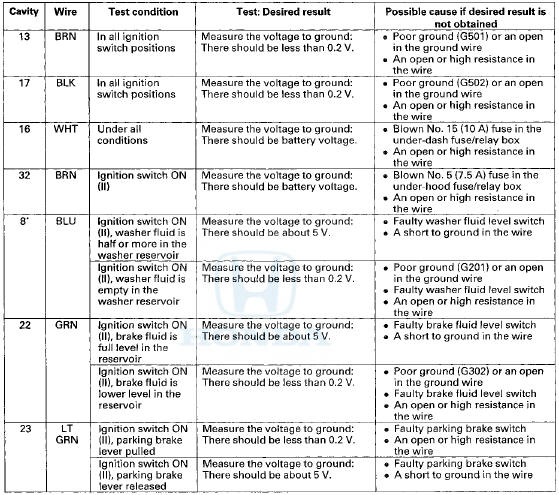
5. Reconnect the 32P connector to the gauge control module, and do these input tests at the following connector.
• If any test Indicates a problem, find and correct the cause, then recheck the system.
• If the input test proves OK, the gauge control module must be faulty; replace it (see page 22-351).
*: Canada models
 DTC Troubleshooting
DTC 81152: Gauge Control Module (EEPROM)
Error
NOTE: If you are troubleshooting multiple DTCs, be sure
to follow the instructions in B-CAN System Diagnosis
Test Mode A (see page 22-134).
1. Cle ...
 Rewriting the ODO Data and
Transferring the Maintenance
Minder Data to a New Gauge Control
Module
Rewriting the ODO Data and
Transferring the Maintenance
Minder Data to a New Gauge Control
Module
NOTE:
• Obtain a new gauge control module before starting
the rewriting process. Only new gauges can be
rewritten.
• Rewriting is not possible on a gauge control module
that will not ...
See also:
Playing Bluetooth® Audio
Your audio system allows you to listen to music from your
Bluetooth®-compatible
phone.
This function is available when the phone is paired and connected to the
vehicle's
Bluetooth® HandsFre ...
AhaTM Radio
If an error occurs while playing AhaTM Radio, you may see the following error
messages.
If you cannot clear the error message, contact a dealer.
...