 Honda Accord: DTC Troubleshooting
DTC 81152:
Gauge Control Module (EEPROM) Error
NOTE: If you are troubleshooting multiple DTCs, be sure to follow the instructions in B-CAN System Diagnosis Test Mode A (see page 22-134).
1. Clear the DTCs with the HDS.
2. Turn the ignition switch to LOCK (0) and then back to ON (II).
3. Wait for at least 6 seconds.
4. Check for DTCs with the HDS.
Is DTC B1152 indicated? Y E S
- R e p l a c e the gauge control module (see page 22-351 ) . NO
-lntermittent failure, the system is OK at this time.
DTC B1175:
Fuel Level Sensor (Fuel Gauge Sending Unit) Circuit Malfunction
NOTE: If you are troubleshooting multiple DTCs, be sure to follow the instructions in B-CAN System Diagnosis Test Mode A (see page 22-134).
1. Clear the DTCs with the HDS.
2. Turn the ignition switch to LOCK (0) and then back to ON (II).
3. Check for DTCs with the HDS.
Is DTC B1175 indicated? Y E S
- G o to step 4.
NO
-lntermittent failure, the fuel level sensor circuit is OK at this time.
4. Test the fuel gauge sending unit (see page 11-328).
Is the fuel gauge sending unit OK? Y E S
- G o to step 5.
N O
- R e p l a c e the fuel tank unit.
5. Turn the ignition switch to ON (II).
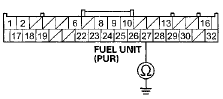
6. Without disconnecting the connectors, measure the voltage between terminals No. 27 and No. 28 of the gauge control module 32P connector and terminals No. 1 and No. 3 of the fuel tank unit 4P connector.
Is there less than 0.2 V? Y E S
- R e p l a c e the gauge control module (see page 22-351 ) . N O
- R e p a i r the loose connection or open or high resistance in the PUR or ORN wire between the gauge control module and the fuel tank unit.
DTC B1176:
Fuel Level Sensor (Fuel Gauge Sending Unit) Circuit Short
NOTE: If you are troubleshooting multiple DTCs, be sure t o follow the instructions in B-CAN System Diagnosis Test Mode A (see page 22-134).
1. Clear the DTCs with the HDS.
2. Turn the ignition switch to LOCK (0) and then back to ON (II).
3. Wait for at least 30 seconds.
4. Check for DTCs with the HDS.
Is DTC B1176 indicated? YES
-Go to step 5.
NO
-lntermittent failure, the fuel level sensor circuit is OK- at this time. Check for worn/missing insulation or an internal short in the wire.
5. Turn the ignition switch to LOCK (0).
6. Disconnect the fuel tank unit 4P connector.
7. Clear the DTCs with the HDS.
8. Turn the ignition switch to ON (II).
9. Wait for at least 30 seconds.
10. Check for DTCs with the HDS.
Is DTC B1176 indicated? YES
-Go to step 11.
NO
-Replace the fuel gauge sending unit (see page 11-324).
11. Disconnect the gauge control module 3 2 P connector.
12. Check for continuity between gauge control module 32P connector terminal No. 27 and body ground.
GAUGE CONTROL MODULE 32P CONNECTOR
Wire side of female terminals
Is there continuity? YES
-Repair a short in the wire between the gauge control module and the fuel tank unit.
NO
-Replace the gauge control module (see page 22-351 ).
DTC U0029:
F-CAN Communication Line Error (BUS-OFF)
NOTE: • Make sure the HDS communicates with the ECM/PCM and other vehicle systems. If it does not, go to DLC Circuit Troubleshooting (see page 11-181).
• If you are troubleshooting multiple DTCs, be sure to follow the instructions in B-CAN System Diagnosis Test Mode A (see page 22-134).
1. Clear the DTCs with the HDS.
2. Turn the ignition switch to LOCK (0) and then back to ON (II).
3. Wait for at least 6 seconds.
4. Check for DTCs with the HDS.
is DTC U0029 Indicated? YES
-Go to step 5.
NO
-lntermittent failure, the F-CAN communication line is OK at this time. Check for DTCs in the ECM/PCM with the HDS. If F-CAN DTCs are present, check for loose or poor connections at the gauge control module and the ECM/PCM. If the connections are good, check the battery condition and the charging system, then clear all DTCs.
5. Check for DTCs in the ECM/PCM with the HDS.
Are any DTCs indicated? YES
-Go to the indicated ECM/PCM DTCs troubleshooting.
NO
-Go to step 6.
6. Do the gauge control module input test (see page 22-347).
Are ail inputs OK? YES
-Go to step 7.
NO
-Repair the faulty input, then recheck the DTCs.
7. Substitute a known-good gauge control module.
8. Clear the DTCs with the HDS.
9. Turn the ignition switch to LOCK (0) and then back to ON (II).
10. Start and run the engine for at least 5 seconds, then turn the engine off.
11. Check for DTCs with the HDS.
Is DTC U0029 indicated? YES-
Go to step 12.
NO
-The original gauge control module is faulty; replace it.
12. Update the ECM/PCM if it does not have the latest coftware, o r substitute a known-good ECM/PCM (see page 11-7).
13. Check for Temporary DTCs or DTCs with the HDS.
Is DTC U0029 indicated? YES
-Check for poor connections or loose terminals at the gauge control module and the ECM/PCM. If the ECM/PCM was updated, substitute a known-good ECM/PCM (see page 11-7), then recheck. If the ECM/PCM was substituted, go to step 1.
NO
-lf the ECM/PCM was updated, troubleshooting is complete. If the ECM/PCM was substituted, replace the original ECM/PCM (see page 11-204).
DTC U0100:
Gauge Control Module Lost Communication With ECM/PCM
NOTE: If you are troubleshooting multiple DTCs, be sure to follow the instructions in B-CAN System Diagnosis Test Mode A (see page 22-134).
1. Clear the DTCs with the HDS.
2. Turn the ignition switch to LOCK (0) and then back to ON (II).
3. Start and run the engine for at least 5 seconds, then turn the engine off.
4. Check for DTCs with the HDS.
Is DTC U0100 Indicated? YES
-Go to step 5.
NO
-lntermittent failure, the F-CAN communication line is OK at this time. Check for DTCs in the ECM/PCM with the HDS. If F-CAN DTCs are present, check for loose or poor connections at the gauge control module and the ECM/PCM. If the connections are good, check the battery condition and the charging system, then clear all DTCs.
5. Check for DTCs in the ECM/PCM with the HDS.
Are any DTCs indicated? YES-
Go to the ECM/PCM indicated DTCs troubleshooting.
NO
-Go to step 6.
6. Do the gauge control module input test (see page 22-347).
Are all inputs OK? YES
-Go to step 7.
NO
-Repair the faulty input, then recheck the DTCs.
7. Substitute a known-good gauge control module.
8. Clear the DTCs with the HDS.
9. Turn the ignition switch to LOCK (0) and then back to ON (II).
10. Start and run the engine for at least 5 seconds, then turn the engine off.
11. Check for DTCs with the HDS.
Is DTC U0100 indicated? YES
-Replace the ECM/PCM (see page 11-204).
NO
-The original gauge control module is faulty; replace it (see page 22-351 ).
DTC U0122:
Gauge Control Module Lost Communication With VSA Modulator-Control Unit (VSA message)
NOTE: If you are troubleshooting multiple DTCs, be sure to follow the instructions in B-CAN System Diagnosis Test Mode A (see page 22-134).
1. Clear the DTCs with the HDS.
2. Turn the ignition switch to LOCK (0) and then back to ON (II).
3. Wait for at least 6 seconds.
4. Check for DTCs with the HDS.
Is DTC U0122 indicated? YES
-Go to step 5.
NO
-lntermittent failure, the F-CAN communication line is OK at this time. Check for DTCs in the ECM/PCM and the VSA modulator-control unit with the HDS.
F-CAN DTCs are present, check for a loose VSA ground or poor connections at the VSA modulatorcontrol unit or gauge control module. If the connections are good, check the battery condition and the charging system, then clear all DTCs.11 5. Check for DTCs in the ECM/PCM or VSA with the HDS.
Are any DTCs indicated? YES
-Go to the ECM/PCM or VSA indicated DTCs, troubleshooting.
NO
-Go to step 6.
6. Do the gauge control module input test (see page 22-347).
Are all inputs OK? YES
-Go to step 7.
NO
-Repair the faulty input, then recheck the DTCs.
7. Substitute a known-good gauge control module.
8. Clear the DTCs with the HDS.
9. Turn the ignition switch to LOCK (0) and then back to ON (II).
10. Check for DTCs with the HDS.
Is DTC U0122 indicated? YES
-Recheck ECM/PCM for DTCs, then recheck the VSA modulator-control unit for DTCs.
NO
-The original gauge control module is faulty; replace it (see page 22-351 )
DTC U0127:
Gauge Control Module Lost Communication With TPMS Control Unit (TPMS message)
NOTE: If you are troubleshooting multiple DTCs, be sure to follow the instructions in B-CAN System Diagnosis Test Mode A (see page 22-134).
1. Clear the DTCs with the HDS.
2. Turn the ignition switch to LOCK (0) and then back to ON (II).
3. Wait for at least 6 seconds.
4. Check for DTCs with the HDS.
Is DTC U0127 indicated? YES
-Go to s t ep 5.
NO
-lntermittent failure, the system is OK at this time.
Check for loose or poor connections.
5. Check for TPMS DTCs with the HDS.
Are DTCs indicated? YES
-Go to the indicated DTCs troubleshooting, then recheck.
NO
-Go to step 6.
6. Turn the ignition switch to LOCK (0).
7. Disconnect the gauge control module 32P connector.
8. Disconnect the TPMS control unit 20P connector.
9. Check for continuity between gauge control module 32P connector terminals No. 29 and No. 30 and TPMS control unit 20P connector terminals No. 11 and No. 1 respectively.
GAUGE CONTROL MODULE 32P CONNECTOR
Wire side of female terminals
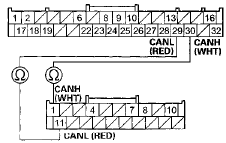
TPMS CONTROL UNIT 20P CONNECTOR
Wire side of female terminals
Is there continuity? YES
-Substitute a known-good TPMS control unit, and recheck. If the indication goes away, replace the original TPMS control unit. If the DTC is still present, replace the gauge control module (see page 22-351 ).
NO-
Repair an open or high resistance in the wire.
DTC U0151:
Gauge Control Module Lost Communication With SRS Unit (SRS message)
NOTE: If you are troubleshooting multiple DTCs, be sure to follow the instructions in B-CAN System Diagnosis Test Mode A (see page 22-134).
1. Clear the DTCs with the HDS.
2. Turn the ignition switch to LOCK (0) and then back to ON (11).
3. Wait for at least 6 seconds.
4 . Check for DTCs with the HDS.
Is DTC U0151 indicated? YES-
Go to step 5.
NO
-lntermittent failure, the system is OK at this time.
Check for loose or poor connections between the gauge control module and the SRS unit.
5. Check for SRS DTCs with the HDS.
Are DTCs indicated? YES
-Go to the indicated DTCs troubleshooting, then recheck.
NO
-Go to step 6.
6. Turn the ignition switch to LOCK (0).
7. Disconnect the gauge control module 32P connector.
8. Disconnect SRS unit connector A (39P).
9. Check for continuity between gauge control module 32P connector terminals No. 29 and No. 30 and SRS unit connector A (39P) terminals No. 16 and No. 17 respectively.
GAUGE CONTROL MODULE 32P CONNECTOR
Wire side of female terminals
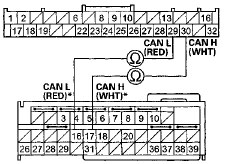
SRS UNIT CONNECTOR A (39P)
Wire side of female terminals
*: B L U , BRN, or GRN wire may be used at the SRS unit.
Is there continuity? YES
-Substitute a known-good SRS unit, and recheck.
If the indication goes away, replace the original SRS unit. If the DTC is still present, replace the gauge control module (see page 22-351 ) . NO
-Repair an open or high resistance in the wire.
DTC U1282:
Gauge Control Module Lost Communication With Driver's MICU
NOTE; If you are troubleshooting multiple DTCs, be sure to follow the instructions in B-CAN System Diagnosis Test Mode A (see page 22-134).
1. Clear the DTCs with the HDS.
2. Turn the ignition switch to LOCK (0) and then back to ON (ll).
3. Wait for at least 6 seconds.
4. Check for DTCs with the HDS.
Is DTC U1282 indicated? YES
-Go to the gauge control module input test, and do all power, ground, and communication input tests (see page 22-347). If the tests prove OK, replace the driver's under-dash fuse/relay box, USA models (see page 22-86), Canada models (see page 22-87).
NO
-lntermittent failure, the system is OK at this time.
Check for loose or poor connections at driver's under-dash fuse/relay box connector P (20P) and the related unit.
DTC U1283:
Gauge Control Module Lost Communication With Passenger's MICU
NOTE: If you are troubleshooting multiple DTCs, be sure to follow the instructions in B-CAN System Diagnosis Test Mode A (see page 22-134).
1. Clear the DTCs with the HDS.
2. Turn the ignition switch to LOCK (0) and then back to ON (II).
3. Wait for at least 6 seconds.
4. Check for DTCs with the HDS.
Is DTC U1283 indicated? YES
-Go to the gauge control module input test, and dc z\\ power, ground, and communication input tests (see page 22-347). If the tests prove OK, replace the driver's under-dash fuse/relay box, USA models (see page 22-86), Canada models (see page 22-87).
NO
-lntermittent failure, the system is OK at this time.
Check for loose or poor connections at passenger's under-dash fuse/relay box connector A (38P) and the related units.
 Circuit Diagram
...
 Gauge Control Module Input Test
NOTE: Before testing, do the gauge control module self-diagnosis function
(see page 22-332), and make sure the B-CAN
communication lines are OK.
1. Turn the ignition switch to LOCK (0).
2. Re ...
See also:
Symptom Troubleshooting
Rapid brake pad wear, vehicle vibration
(after a long drive), or high, hard brake pedal
NOTE: Make sure that the caliper pins are installed
correctly. Upper caliper pin B and lower caliper pin A ar ...
Transmission Fluid Inspection and Replacement
1. Raise the vehicle on a lift, and make sure it is securely
supported.
2. Remove the front splash shield (see page 20-291).
3. Remove the oil filler plug (A) and the sealing washer
(B), check ...
Clutch Hydraulic System Bleeding
NOTE:
- Do not reuse the drained fluid. Always use Honda
DOT 3 Brake Fluid from an unopened container. Using
a non-Honda brake fluid can cause corrosion and
shorten the life of the system.
- Ma ...