
 Honda Accord: Transmission Fluid Inspection and Replacement
1. Raise the vehicle on a lift, and make sure it is securely supported.
2. Remove the front splash shield (see page 20-291).
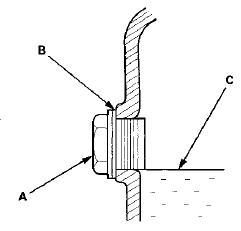
3. Remove the oil filler plug (A) and the sealing washer (B), check the condition of the MTF, and make sure it is at the proper level (C).
4. If the fluid is dirty, remove the drain plug (A) and the sealing washer (B), and drain the MTF.
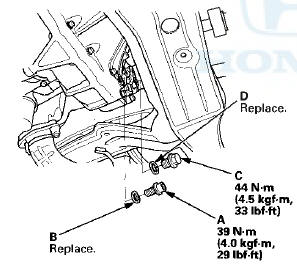
5. Install the drain plug with a new sealing washer, and refill the transmission with MTF to the proper level.
Always use Honda Manual Transmission Fluid (MTF).
Fluid Capacity:
1.9 L (2.0 US qt) at fluid change
2 0 L (2.1 US qt) at overhaul
6. Install the filler plug (C) with a new sealing washer (D).
7. Install the front splash shield (see page 20-291).
8. Lower the vehicle on the lift.
9. Connect the Honda Diagnostic System (HDS) to the data link connector (DLC) (see step 2 on page 11-3). ' 10. Turn the ignition switch to ON (II).
11. Make sure the HDS communicates with the vehicle and the engine control module (ECM). If it does not communicate, go to the DLC circuit troubleshooting (see page 11-181).
12. Select GAUGE MENU in the BODY ELECTRICAL with the HDS.
13. Select ADJUSTMENT in the GAUGES MENU with the HDS.
14. Select MAINTENANCE MINDER in the ADJUSTMENT with the HDS.
15. Select RESET in the MAINTENANCE MINDER with the HDS.
16. Select RESETTING THE MTF LIFE with the HDS.

 Back-up Light Switch Test
1. Disconnect the back-up light switch 2P connector (A).
2. Check for continuity between back-up light switch 2P
connector terminals No. 1 and No. 2. There should be
continuity only when the shif ...
See also:
Supplemental restraint system (SRS) (if steering maintenance is required)
The Accord SRS includes a driver's airbag in the steering wheel hub, a
passenger's airbag in the dashboard
above the glove box, seat belt tensioners in the front seat belt retractors,
side curtai ...
Mirrors
Keep the inside and outside mirrors
clean and adjusted for best visibility.
Be sure to adjust the mirrors before
you start driving.
The inside mirror has day and night
positions. The night p ...
Park Lever Stop Inspection and
Adjustment
1. Set the park lever in the P position.
2. Measure the distance (A) between the park pawl shaft
(B) and the park lever roller pin (C).
Standard: 57.7-58.7 mm (2.27-2.31 in)
3. If the measurem ...