 Honda Accord: Clutch Hydraulic System Bleeding
NOTE: - Do not reuse the drained fluid. Always use Honda DOT 3 Brake Fluid from an unopened container. Using a non-Honda brake fluid can cause corrosion and shorten the life of the system.
- Make sure no dirt or other foreign matter is allowed to contaminate the brake fluid.
- Do not spill brake fluid on the vehicle; it may damage the paint or plastic. If brake fluid does contact the paint or plastic, wash it off immediately with water.
- It may be necessary to limit the movement of the release fork with a block of wood to remove all the air from the system.
- Use fender covers to avoid damaging painted surfaces.
1. Do the battery removal procedure (see page 22-92).
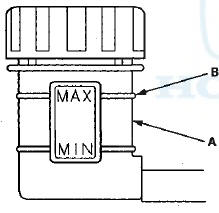
2. Make sure the brake fluid level in the clutch reservoir (A) is at the MAX (upper) level line (B).
3. Attach one end of a clear tube to the bleeder screw (A), and put the other end into a container. Loosen the bleeder screw to allow air to escape from the system.
4. Make sure there is an adequate supply of fluid in the reservoir, then slowly push the clutch pedal all the way down. Before releasing the pedal, have an assistant temporarily tighten the bleeder screw.
Loosen the bleeder screw, and push the clutch pedal down again. Repeat this step until no more bubbles appear at the clear tube.
NOTE: Make sure the fluid level on the reservoir does not go below MIN.
5. Tighten the bleeder screw securely.
6. Refill the brake fluid in the reservoir to the MAX (upper) level line.
7. Do the battery installation procedure (see page 22-92).
 System Description
Delay Orifice Mechanism
Function
The delay orifice mechanism improves clutch operation by delaying the slave
cylinder release speed when the clutch
pedal is suddenly released. The delay orifice m ...
 Clutch Pedal, Clutch Pedal Position Switch, and
Clutch Interlock Switch Adjustment
Clutch Pedal, Clutch Pedal Position Switch, and
Clutch Interlock Switch Adjustment
NOTE:
- For a cruise control problem, check the clutch pedal
position switch (see page 4-45).
- For a clutch interlock operation problem, check the
clutch interlock switch (see page 4-9).
- R ...
See also:
Tire Labeling
The tires that came on your vehicle
have a number of markings. Those
you should be aware of are described
below.
Tire Size
Whenever tires are replaced, they
should be replaced with tires o ...
Adjust the Front Seats.
Adjust the driver’s seat as far to the
rear as possible while allowing you to
maintain full control of the vehicle.
Have a front passenger adjust their
seat as far to the rear as possible.
...
Front Door Glass Outer Weatherstrip
Replacement
NOTE:
- Put on gloves to protect your hands.
- Take care not to scratch the door.
1. Remove t h e s e Items:
- Door panel
- 2-door (see page 20-12)
- 4-door (see page 20-17)
- Plastic cover ...