 Honda Accord: System Description
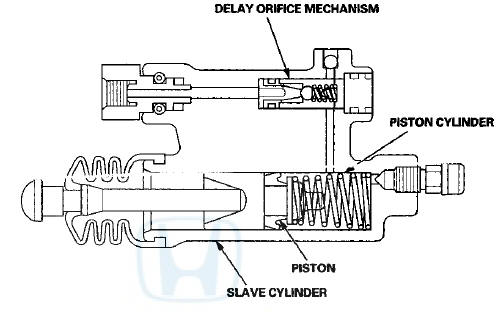
Delay Orifice Mechanism
Function
The delay orifice mechanism improves clutch operation by delaying the slave cylinder release speed when the clutch pedal is suddenly released. The delay orifice mechanism is built into the slave cylinder
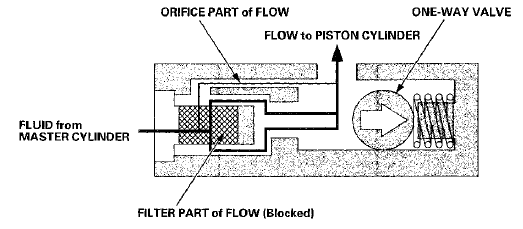
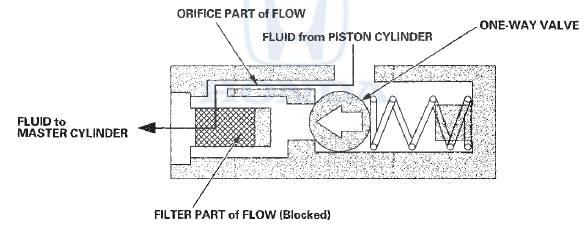
Fluid Flow Operation
When the clutch pedal is pressed, the fluid pressure from the master cylinder moves the one-way valve in the direction shown in the illustration. The fluid flows through two passages: the orifice part and the filter part. It then flows out to the piston cylinder to release the pressure plate and clutch disc joint.
When the clutch pedal is released, the fluid pressure from the piston cylinder moves the one-way valve in the direction shown in the illustration. The one-way valve blocks the filter-part passage and delays the clutch release speed by returning the fluid to the master cylinder through only the orifice-part passage.

 Clutch Hydraulic System Bleeding
NOTE:
- Do not reuse the drained fluid. Always use Honda
DOT 3 Brake Fluid from an unopened container. Using
a non-Honda brake fluid can cause corrosion and
shorten the life of the system.
- Ma ...
See also:
Playing the FM/AM Radio (Models without navigation system)
Playing the FM/AM Radio (Models without navigation system) ...
Engine Oil Life Display
To see the current engine oil life,
turn the ignition switch to the ON
(II) position, then press and release
the select/reset knob repeatedly
until the engine oil life indicator
appears.
...
Fuel Tank Replacement
1. Drain the fuel tank (see page 11 -309).
2. Reinstall the fuel tank unit without connecting the fuel
tank unit 4P connector and the quick-connect fitting
(see page 11-321).
3. Remove the fue ...