 Honda Accord: Sunshade Replacement
1. Remove the drain channel (see page 20-94).
2. Slide the sunshade (A) until you can see both sunshade slider spacers (B).
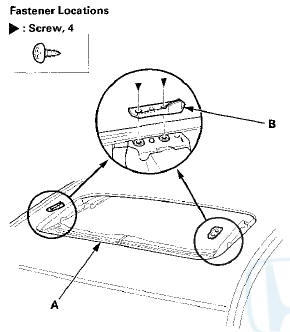
3. Remove the screws, then remove both sunshade slider spacers.
4. While lifting the front area of the sunshade (A), move the sunshade forward until you can see both sunshade rear hooks (B). Do not damage the sunshade or the hooks.
5. Remove the screws, then remove both hooks.
6. Remove the sunshade (A).
7. Remove both front sunshade base sliders (A) and both rear sunshade base sliders (B).
8. Install the sunshade in the reverse order of removal, and check the glass position adjustment (see page 20-91).
9. Check for water leaks (see step 9 on page 20-57). Let the water run freely from a hose without a nozzle. Do not use a high-pressure spray.
 Drain Channel Replacement
1. Remove the moonroof glass (see page 20-91).
2. On both sides, slide the glass brackets (A) with the
moonroof switch to the position where the moonroof
normally tilts up and disconnect the drai ...
 Motor Replacement
NOTE: Put on gloves to protect your hands.
1. Remove the headliner (see page 20-140).
2. Disconnect the connector (A), and remove the screws,
then remove the motor (B).
3. Install the motor ...
See also:
Windshield Wipers andWashers
Windshield Wipers
1. MIST
2. OFF
3. INT - Intermittent
4. LO - Low speed
5. HI - High speed
6. Windshield washers
Push the right lever up or down to
select a position.
MIST - The wipe ...
Door Lock Knob Switch Test
Driver's Door
1. Remove the driver's door panel (see page 20-17).
2. Disconnect the 10P connector (A) from the door lock
actuator (B).
3. Check for continuity between the terminals.
• ...
Shifting
Change the shift position in accordance with your driving needs.
• Shift lever positions
You cannot change the power mode from ON to
VEHICLE OFF (LOCK) unless the shift lever is in (P.
The ve ...