 Honda Accord: Front Seat Torsion Bar Replacement
2-door Driver's seat (manual height adjustable seat)
NOTE: - Put on gloves to protect your hands.
- Take care not to tear or damage the seat covers.
- When prying with a flat-tip screwdriver, wrap it with protective tape to prevent damage.
1. Remove the front seat (see page 20-194).
2. Adjust the seat to its maximum height.
3. Release the hook strips from both sides and under of the seat cushion frame, then loosen the seat cushion cover (see step 24 on page 20-232).
4. Lever a hooked shaped end of the torsion bar (A) down using a large flat-tip screwdriver.
5. While holding the torsion bar (A) twisted, pull out the end of the torsion bar of the seat frame, then carefully loosen the torsion bar.
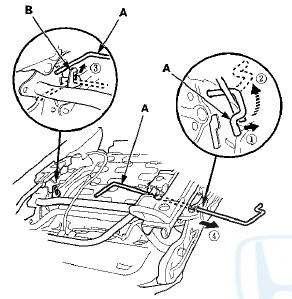
6. Remove the other side end of the torsion bar from the hook (B), then remove the torsion bar from the seat frame.
7. Install the torsion bar in the reverse order of removal.
 Front Seat Slide Lever Replacement
Driver's seat (manual height adjustable
seat)/passenger's seat
NOTE:
- Put on gloves to protect your hands.
- Take care not to tear or damage the seat covers.
1. Remove the front seat {see pa ...
 Rear Seat Access Cable Replacement
2-door Passenger's Seat
NOTE:
- Put on gloves to protect your hands.
- Take care not to kink the rear seat access cable.
- The right rear seat access cable is shown; the left rear
seat access ...
See also:
Steering Linkage and Gearbox Inspection
...
Audio Unit Removal/Installation
With Navigation
SRS components are located in this area. Review the
SRS component locations (see page 24-23), and the
precautions and procedures (see page 24-25) before
doing repairs or service.
...