 Honda Accord: Center Display Visor
Removal / Installation
Honda Accord: Center Display Visor
Removal / Installation
Special Tools Required
KTC Trim Tool Set SOJATP2014*
*Available through the Honda Tool and Equipment Program; call 888-424-6857
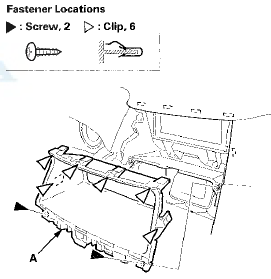
Without Navigation System
NOTE: - Take care not to scratch the dashboard or the related parts.
- Use the appropriate tool from the KTC trim tool set to avoid damage when removing components.
1. Remove these items: - Center pocket (see page 20-168) - Driver's inner dashboard trim (see page 20-167) - Passenger's dashboard trim (see page 20-173) - Audio-HVAC module (see page 23-115) 2. Remove the center display visor (A).
-1. Remove the screws.
-2. Pull out the visor to detach the clips.
Special Tools Required
KTC Trim Tool Set SQJATP2014*
* Available through the Honda Tool and Equipment Program; call 888-424-6857
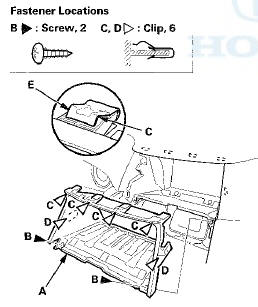
With Navigation System
NOTE: - Take care not to scratch the dashboard or the related parts.
- Use the appropriate tool from the KTC trim tool set to avoid damage when removing components.
1. Remove the dashboard center vent (see page 20-178) 2. Remove the center display visor (A).
-1. Remove the screws (B).
-2. Pull out the upper edge of the visor to detach the upper clips (C).
-3. Pull out the visor to detach the side clips (D).
NOTE: If the non-woven fabric (E) on the upper clips are damaged, replace them with new ones.
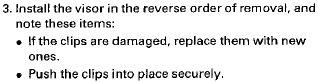
3. Install the cover in the reverse order of removal, and note these items: - If the clips are damaged, replace them with new ones.
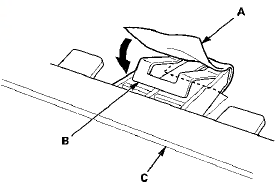
- If the upper clip is replaced, attach the new non-woven fabric (A) around new clip (B) as the following procedures.
- After installing new clip to the visor (C), clean the clip and the visor surfaces with a shop towel dampened in isopropyl alcohol. After cleaning, keep oil, grease, and water from getting on the surface.
- Attach the non-woven fabric with adhesive tape around the clip.
- Push the clips into place securely.
Non-woven fabric:
Thickness 0.5 mm (0.02 in)
Width 20 mm (0.79 in)
Length 25 mm (0.98 in)
Non-woven fabric adhesive tape:
Thickness 0.16 mm (0.006 in)
Width 20 mm (0.79 in)
Length 25 mm (0.98 in)
 Dashboard Center Lower Cover
Removal/Installation
Dashboard Center Lower Cover
Removal/Installation
Special Tools Required
KTC Trim Tool Set SOJATP2014*
*Available through the Honda Tool and
Equipment
Program; call 888-424-6857
SRS components are located in this area. Review the
SRS component ...
 Passenger's Dashboard Trim
Removal/Installation
Passenger's Dashboard Trim
Removal/Installation
Special Tools Required
KTC Trim Tool Set SOJATP2014*
* Available through the Honda Tool and
Equipment
Program; call 888-424-6857
NOTE:
- Take care not to scratch the dashboard or the related
p ...
See also:
F-CAN Circuit Troubleshooting
1. Turn the ignition switch to LOCK (0).
2. Jump the SCS line with the HDS.
3. Disconnect ECM/PCM connector A (49P).
4. Measure the resistance between ECM/PCM connector
terminals A3 and A4.
...
Wheel Bearing End Play Inspection
1. Raise and support the vehicle (see page 1-13).
2. Remove the wheels.
3 . Install suitable flat washers (A) and the wheel nuts.
Tighten the nuts to the specified torque to hold the
brake d ...
Oil Seal Replacement
Special Tools Required
•Driver Handle, 15 x 135L 07749-0010000
•Oil Seal Driver Attachment 07947-SD90101
-Oil Seal Driver Attachment 07JAD-PH80101
1. Remove the oil seal from the transmi ...