 Honda Accord: Passenger's Dashboard Trim
Removal/Installation
Honda Accord: Passenger's Dashboard Trim
Removal/Installation
Special Tools Required
KTC Trim Tool Set SOJATP2014*
* Available through the Honda Tool and Equipment Program; call 888-424-6857
NOTE: - Take care not to scratch the dashboard or the related parts.
- Use the appropriate tool from the KTC trim tool set to avoid damage when removing components.
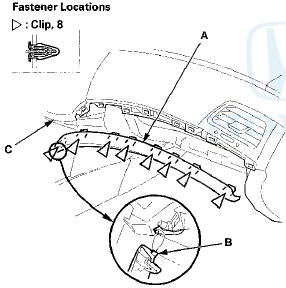
1. Remove the passenger's dashboard trim (A).
-1. Open the glove box.
-2. Pull out on the outside bottom edge of the trim by hand.
-3. Detach the clips along the trim.
-4. Release the hook (B) from under the center panel (C).
2. Install the trim in the reverse order of removal, and note these items: - If the clips are damaged or stress-whitened, replace them with new ones.
- First insert the hook under the center panel, then push the clips into place securely.
 Center Display Visor
Removal / Installation
Center Display Visor
Removal / Installation
Special Tools Required
KTC Trim Tool Set SOJATP2014*
*Available through the Honda Tool and
Equipment
Program; call 888-424-6857
Without Navigation System
NOTE:
- Take care not to scratch the d ...
 Glove Box Lock Cylinder Replacement
NOTE: Take care not to scratch the glove box.
1. Remove the glove box (see page 20-174).
2. While lifting the glove box handle (A), pull out one
end of the retainer (B) with a hook-shaped tool ...
See also:
To Stop Playing a Disc
Press the eject button ( ) to
remove the disc. If you eject the disc,
but do not remove it from the slot,
the system will automatically reload
the disc after 10 seconds and begin
playing.
...
Steering Linkage and Gearbox Inspection
...
AM/FM Antenna Amplifier
Replacement
1. Remove the C-pillar trim.
• 4-door (see page 20-110)
• 2-door (see page 20-110)
2. Disconnect the connectors (A) from the AM/FM
antenna amplifier (B).
4-Door
2-Door
3. Remove ...