 Honda Accord: Rear Seat Access Cable Replacement
2-door Passenger's Seat
NOTE: - Put on gloves to protect your hands.
- Take care not to kink the rear seat access cable.
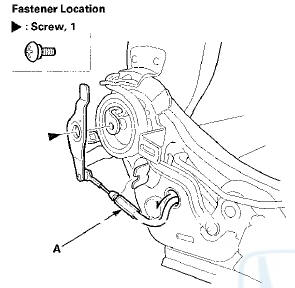
- The right rear seat access cable is shown; the left rear seat access cable is similar.
1. Remove the front seat (see page 20-194).
2. Remove the seat cushion cover/pad (see page 20-226).
3. Note positions of the rear seat access cable (A), then remove the cable.
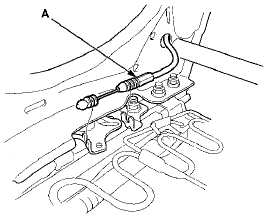
4. Remove the screw, then remove the rear seat access cable (A).
5 . Install the access cable in the reverse order of removal, a n d note these items: - Make sure the access cable is connected securely.
- Install the access cable in the same positions noted in step 3. Check the rear seat access operation: Make sure both of the seat tracks unlatches simultaneously and the seat slides forward when the seat-back is folded down.
 Front Seat Torsion Bar Replacement
2-door Driver's seat (manual height
adjustable seat)
NOTE:
- Put on gloves to protect your hands.
- Take care not to tear or damage the seat covers.
- When prying with a flat-tip screwdriver, ...
 Front Seat Frame Replacement
Driver's Seat
Front Seat Frame Replacement
Driver's Seat
Special Tools Required
KTC Trim Tool Set SOJATP2014*
*Available through the Honda Tool and
Equipment
Program; call 888-424-6857
SRS components are located in this area. Review the
SRS component ...
See also:
Adding Engine Oil
1. Unscrew and remove the engine oil fill cap.
2. Add oil slowly.
3. Reinstall the engine oil fill cap, and tighten
it securely.
4. Wait for three minutes and recheck the
engine oil dipsti ...
Circuit Diagram
With automatic lighting
Without automatic lighting
Back-up Lights
Brake Lights
...
Transaxle
Priweline/Ajcle ...