 Honda Accord: Defogger Wire Repair
NOTE: To make an effective repair, the broken section must be no longer than 1.0 in (25 mm).
1. Lightly rub the area around the broken section (A) with fine steel wool, then clean it with isopropyl alcohol.
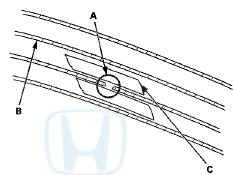
2. Carefully mask above and below the broken portion of the defogger wire (B) with cellophane tape (C).
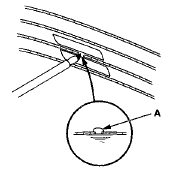
3. Using a small brush, apply a heavy coat of silver conductive paint (commercially available) (A) extending about 1/8" o n both sides of the break. Allow 25 minutes to dry.
4. Do the function test to confirm that the wire is repaired.
5. Apply a second coat of paint in the same way. Let it dry 3 hours before removing the tape.
 Function Test
NOTE;
• With climate control: Before testing, troubleshoot the
B-CAN System Diagnosis Test Mode A (see page
22-134).
• Before testing, check the No. 4 (40 A) fuse in the
under-hood fu ...

See also:
Seat Heaters
EX-L and all V6 models
Both front seats are equipped with
seat heaters. Because of the sensors
for the side airbag cutoff system,
there is no heater in the passenger’s
seat-back. The igni ...
ENGINE START/STOP Button
• Changing the Power Mode
ENGINE START/STOP Button Operating Range
You can start the engine when the smart entry
remote is inside the vehicle.
The engine may also run if the smart entry r ...
Inboard Joint Side
1. Wrap the splines with on the driveshaft vinyl tape (A)
to prevent damaging the inboard boot.
2. Install the inboard boot onto the driveshaft, then
remove the vinyl tape. Be careful not to dama ...