
 Honda Accord: Closing Force and Opening Drag
Check
Honda Accord: Closing Force and Opening Drag
Check
1. Remove the headliner (see page 20-140).
2. Closing force check: - Cover the leading edge of the glass (A) with a shop towel (B), and attach a spring scale (C) as shown.
- Have an assistant hold the switch to close the glass while you measure the force required to stop it.
- Read the force as soon as the glass stops moving, then immediately release the switch and a spring scale.
Closing force: 200-290 N (20-30 kgf, 4 4 - 6 6 ibf)
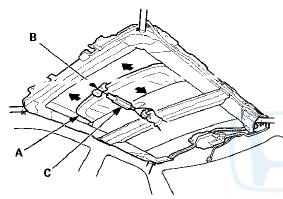
3. If the force in not within specification, remove the moonroof motor ( s e e page 20-96), and check the following items: - Check the gear teeth and the inner cable for breakage or damage. If the gear teeth-are broken, replace the motor. If the inner cable is damaged, remove the frame (see page 20-97), and replace the cable (see page 20-100).
- Check the moonroof motor (see page 22-373). If the motor fails to run or does not turn smoothly, replace it with a new one.
- Check the opening drag. Go to step 4.
4. Opening drag check: Cover the leading edge of the glass with a shop towel (A). Measure the effort required to open the glass with a spring scale (B) as shown.
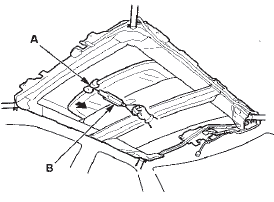
5. If the load is over 40 N (4 kgf, 9 Ibf), check: - The side clearance and glass position adjustment (see page 20-91).
- For broken or damaged sliding parts. If any sliding parts are damaged, replace them.
6. Reset the moonroof control unit (see page 22-371) after reinstalling the moonroof motor.
 Drain Channel Slider and Cable
Assembly Replacement
Drain Channel Slider and Cable
Assembly Replacement
NOTE: Put on gloves to protect your hands.
1. Remove these items: .
- Headliner (see page 20-140)
- Moonroof glass (see page 20-91)
2. Remove the frame (see page 20-97).
3. Remove these par ...
 Interior Trim
...
See also:
Wheel Bolt Replacement
Special Tools Required
B a i l Joint Remover, 28 mm 07MAC-SL0A202
- Do not use a hammer or impact tools (pneumatic or
electric) to remove and install the wheel bolts.
- Be careful not to damag ...
Customer Service Information
Honda dealership personnel are
trained professionals. They should
be able to answer all your questions.
If you encounter a problem that your
dealership does not solve to your
satisfaction, pl ...
Tools
Types of Tools
The tools were stored in the trunk. ...