 Honda Accord: Carrier Bearing Preload Inspection
Special Tools Required
•Driver Handle, 15 x 135L 07749-0010000
•Attachment, 72 x 75 mm 07746-0010600
-Preload Inspection Tool 07HAJ-PK40201
NOTE; -If the transmission housing, the torque converter housing, the differential carrier, the carrier bearing, and the outer race, or the thrust shim were replaced, the bearing preload must be adjusted.
В© Coat all parts with ATF during installation.
-Do not use the thrust shim from the torque converter housing.
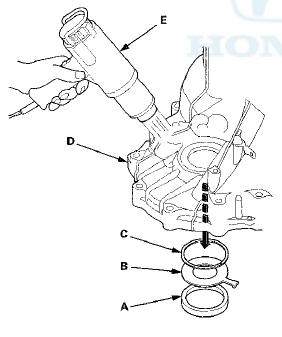
1. Remove the bearing outer race (A), the 76.2 mm thrust washer (B), and the 76 mm thrust shim (C) from the transmission housing (D) by heating the transmission housing to about 212 В°F {100 В°C) using a heat gun (E). Do not heat the transmission housing more than 212 В°F (100 В°C).
NOTE: Let the transmission housing cool to room temperature before adjusting the bearing preload.
2. Install the 76 mm thrust shim (A) in the transmission housing (B). If you replace the 76 mm thrust shim with a new one, use the same thickness shim as the old one.
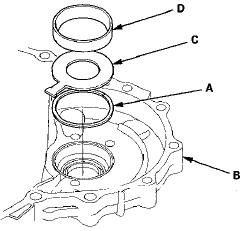
3. Install the 76.2 mm thrust washer (C) and the bearing outer race (D) in the transmission housing.
NOTE: Be sure to install the 76.2 mm thrust washer with the "41382 RKY" mark facing downward.
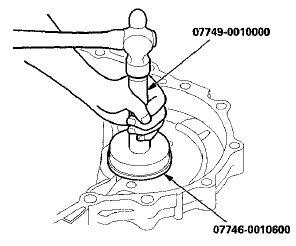
4. Install the bearing outer race securely so there is no clearance between the bearing outer race, the 76.2 mm thrust washer, the 76 mm thrust shim, and the transmission housing, using the driver handle and the 72 x 75 mm attachment.
5. Install the differential assembly (A) in the torque converter housing (B), and install the gasket (C) and the dowel pins (D) on the torque converter housing.
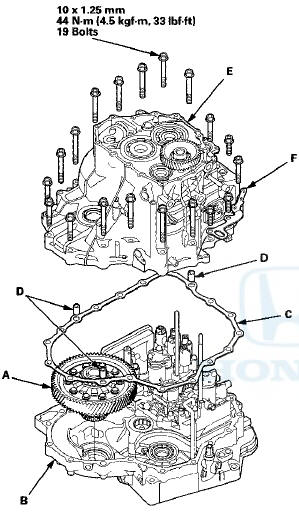
6. Install the transmission housing (E) and the transmission hanger (F), then tighten the bolts.
7. Rotate the differential assembly in both directions to seat the bearings.
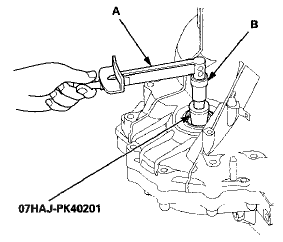
8. Measure the starting torque of the differential assembly in both directions using the preload inspection tool, a torque wrench (A), and a socket (B) at normal room temperature.
Standard
New Bearing: 2.7—3.9 N-m
(28-40 kgfcm, 2 4 - 3 5 Ibf-in)
Reused Bearing: 2.5—3.6 N-m
( 2 5 - 3 / kgfcm, 2 2 - 3 2 Ibf in)
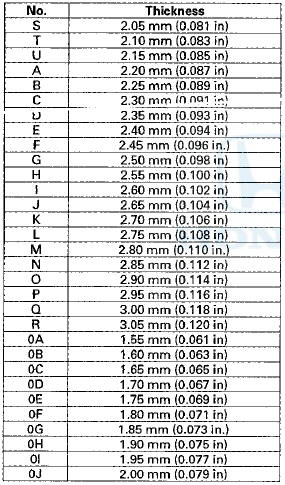
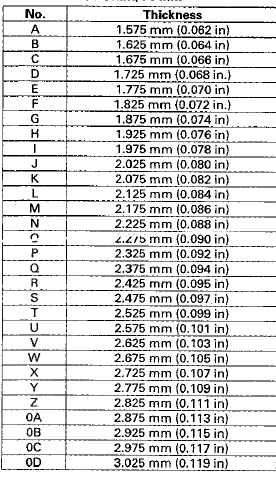
9. If the starting torque is out of standard, remove the 76 mm thrust shim and select a 76 mm thrust shim from the following table. Install a new 76 mm thrust shim, and recheck. To increase the starting torque, increase the thickness of the 76 mm thrust shim. To decrease the starting torque, decrease the thickness of the 76 mm thrust shim. Changing the 76 mm thrust shim to the next size will increase or decrease starting torque about 0.3-0.4 N-m ( 3 - 4 kgf-cm, 2 - 3 Ibf in).
TYPE A THRUST SHIfVS, 76 mm
TYPE B THRUST SHIM, 76 mm
 Carrier Bearing Outer Race
Replacement
Carrier Bearing Outer Race
Replacement
Special Tools Required
-Driver Handle, 15 x 135L 07749-0010000
-Attachment, 78 x 80 mm 07NAD-PX40100
-Attachment, 72 x 75 mm 07746-0010600
NOTE:
-The bearing and the bearing outer race should be
...
 Transaxle
Priweline/Ajcle ...
See also:
Stall Speed Test
1. Wake sure the transmission fluid is filled to the proper
level (see page 14-191).
2. Apply the parking brake, and block all four wheels.
3. Connect the HDS to the DLC (A) located under the
...
Dashboard
With Navigation System
Without Navigation System
...
VSA Sensor Neutral Position Memorization
NOTE: Do not press the brake pedal during this
procedure.
1. Park the vehicle on a flat and level surface, with the
steering wheel in the straight ahead position.
2. With the ignition switch i ...