 Honda Accord: Cam Chain Inspection
Special Tools Required
Cam Chain inspection Gauge 07AAJ-RWCA100
1. Remove the front wheels.
2. Remove the splash shield (see step 25 on page 5-5).
3. Remove the cylinder head cover (see page 6-73).
4. Rotate the crankshaft pulley two turns clockwise.
5. Set the No. 1 piston at top dead center (TDC). The punch mark (A) on the variable valve timing control (VTC) actuator and the punch mark (B) on the exhaust camshaft sprocket should be at the top. Align the TDC marks (C) on the VTC actuator and the exhaust camshaft sprocket.
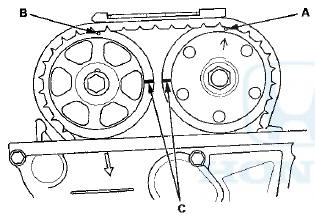
6. Measure the clearance between the cam chain (A) and the tensioner arm (B) with the cam chain inspection gauge (07AAJ-RWCA100).
- If the clearance is OK, go to step 17.
- If the clearance is more than the service limit, go to step 7.
Chain-to-Arm Clearance
Service Limit:
MIL on with P0341: 4.3 mm (0.17 in)
Without MIL: 5.5 mm (0.22 in)
7. Remove the oil pan (see page 7-11).
8. Support the engine with a jack and a wood block under the engine block.
NOTE: Do not hit the oil pump and the baffle plate when placing the jack on the edge of the engine block.
9. Remove the cam chain (see page 6-62), and check the teeth on the crankshaft sprocket, the VTC actuator, and the exhaust camshaft sprocket for wear and damage. If any of them are worn or damaged, replace if necessary.
10. Check the oil passage on the auto-tensioner for clogs.
If the auto-tensioner is clogged, replace it.
11. Measure the length of the oil pump chain auto-tensioner rod.
Oil Pump Chain Auto-Tensioner Rod Length
Service Limit: 13 mm (0.51 in)
12. If the length is over the service limit, replace the oil pump chain (see page 8-25). When replacing, check the teeth on the crankshaft sprocket and the oil pump sprocket for wear and damage, if any of them are worn or damaged, replace if necessary.
13. Check the oil passage on the oil pump chain auto-tensioner for clogs. If the auto-tensioner is clogged, replace it.
14. Install the new cam chain (see page 6-64).
15. Remove the jack and the wood block.
16. Install the oil pan (see page 7-30).
17. Install the cylinder head cover (see page 6-74).
18. Install the splash shield (see step 47 on page 5-20).
19. Install the front wheels.
 Cam Chain Case Oil Seal
Installatio
Cam Chain Case Oil Seal
Installatio
Special Tools Required
Driver Handle, 15 x 135L 07749-0010000
Attachment, 52 x 55 mm 07746-0010400
1. Clean and dry the crankshaft oil seal.
2. Apply a light coat of new engine oil to the lip of ...
 Cf Under Head Cover Mmmmm
1. Remove the strut brace (if equipped) (see page
20-306).
2. Remove the engine cover.
3. Remove the four ignition coils (see page 4-20).
4. Remove the dipstick (A), and the power steering ( ...
See also:
Spark Plug Inspection
1. Remove the ignition coils (see page 4-20).
2. Remove the spark plugs, then inspect the electrodes
and the ceramic insulator.
- Burned or worn electrodes may be caused by these
conditions:
...
Cf Under Head Removal
NOTE:
- Use fender covers to avoid damaging painted
surfaces.
- To avoid damage, unplug the wiring connectors
carefully while holding the connector portion.
- Connect the Honda Diagnostic Sys ...
Connecting Rod Bearing Replacement
Connecting Rod Bearing Clearance Inspection
1. Remove the oil pump (see page 8-17).
2. Remove the baffle plate (see step 8 on page 7-14).
3. Remove the connecting rod cap and the bearing half.
...