 Honda Accord: ATF Replacement
NOTE: Keep all foreign particles out of the transmission.
1. Park the vehicle on level ground.
2. Warm up the engine to normal operating temperature (the radiator fan comes on), and turn the engine off.
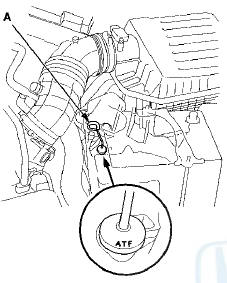
3. Remove the drain plug (A), and drain the ATF. Then reinstall the drain plug with a new sealing washer (B).
NOTE: If ATF cooler cleaning is necessary, refer to ATF cooler cleaning (see page 14-217).
4. Remove the ATF dipstick, and refill the transmission with the recorrimended fluid amount through the dipstick hole to bring the fluid level between the upper mark and the lower mark of the dipstick. Always use Honda ATF-Z1 automatic transmission fluid (ATF).
Using a non-Honda ATF can affect shift quality.
Automatic Transmission Fluid Capacity:
2.5 L (2.6 US qt) at change
6.5 L (6.9 qt) at overhaul
5. insert the dipstick (A) back into the transmission with the letters "ATF" pointing toward the front of the vehicle.
6. Check the ATF level (see page 14-191).
7. If the maintenance minder recommends replacing the ATF, reset the maintenance minder (see page 3-7), and this procedure is complete. If the maintenance minder did not require you to recommends replace the ATF, go to step 8.
8. Connect the HDS to the DLC (A) located under the driver's side of the dashboard.
9. Turn the ignition switch to ON (II). Make sure the HDS communicates with the PCM. If it does not, go to the DLC circuit troubleshooting (see page 11-181).
10. Select BODY ELECTRICAL with the HDS.
11. Select ADJUSTMENT in the GAUGE MENU with the HDS.
12. Select RESET in the MAINTENANCE MINDER with the HDS.
13. Select MAINTENANCE SUB ITEM 3 RESET, and reset the ATF life with the HDS.
 ATF Level Check
NOTE:
-Keep all foreign particles out of the transmission.
-Check the ATF level within 60—90 seconds after
turning the engine off.
-Higher ATF level may be indicated if the radiator fan
...
 Transmission Removal
Special Tools Required
-Engine Hanger Adapter VSB02C000015*
-Engine Support Hanger, A and Reds AAR-T1256*
- Subframe Adapter VSB02C000016*
*: Available through the Honda Tool and Equipment
Progra ...
See also:
Symptom Troubleshooting Index
When the vehicle has one of these symptoms, check for a diagnostic trouble
code (DTC) with the HDS. If there is no DTC,
do the diagnostic procedure for the symptom, in the sequence listed, until yo ...
Compass
EX-L and all V6 without navigation
system ...
Alternator Overhaul
Exploded View
Special Tools Required
- Driver Handle, 15 x 135L 07749-0010000
- Bearing Driver Attachment, 42 x 47 mm 07746-0010300
NOTE: Refer to the Exploded View as needed during this
proced ...