 Honda Accord: Symptom Troubleshooting
Loiw tire pressure Indicator does not come on, and no DTCs are stored
NOTE: Check for gauge DTCs with the HDS (see page 22-3). If gauge DTCs are stored, troubleshoot those DTCs first.
1. Turn the ignition switch to ON (ll).
2. Check the low tire pressure indicator for several seconds when the ignition switch is turned ON (II).
Did the indicator come on, and then go off? YES
-Go to step 3.
NO
-Do the troubleshooting for the gauge control module (see page 22-332). If necessary, substitute a known-good gauge control module (see page 22-351), and recheck.
3. Test-drive the vehicle at 28 mph (45 km/h) or more for at least 1 minute.
4. Stop the vehicle, and lower the pressure in each tire until the low tire pressure indicator comes on (see table).
NOTE: - Reinflate the tire before continuing to the next tire.
- After noting whether the low tire pressure indicator came on, make sure it goes off when you reinflate the tire before proceeding to the next tire.
- If 5 minutes has passed since finishing the last test-drive, reactivate the appropriate tire pressure sensor using the TPMS tool (see page 18-61).
Does the indicator come on when the pressure drops below the specified tire pressure lower limit? YES
-The system is OK at this time.
NO
-Go to step 5.
5. Do the tire pressure sensor location procedure to determine the affected tire location and relate it to the tire pressure sensor number (see page 18-61).
Did each tire pressure sensor respond to the TPMS tool?
YES
-Go to step 6.
NO
-Check that the tire pressure sensor is properly mounted. If necessary, replace the appropriate tire pressure sensor (see page 18-84).
6. Check the TIRE 1, TIRE 2, TIRE 3, or TIRE 4 AIR PRESSURE in the TPMS DATA LIST with the HDS, and compare with the actual measured tire pressure.
Is the indicated tire pressure on the HDS within (0.4 kgf/cm2, 6 psi) of the actual tire pressure? YES
-Go to step 7 , NO
-Replace the appropriate tire pressure sensor (see page 1S-S4).
7. Turn the ignition switch to LOCK (0).
8. Disconnect the TPMS control unit 20P connector.
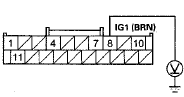
9. Measure the voltage between TPMS control unit 20P connector terminals No. 4 and No. 8.
TPMS CONTROL UNIT 20P CONNECTOR
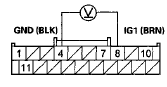
Wire side of female terminals
I s fftere battery voltage? YES
-Repair a short to power in the wire between the TPMS control unit and the No. 5 (7.5 A) fuse in the driver's under-dash fuse/relay box.
NO
-Check for loose terminals and poor connections at the TPMS control unit. If necessary, substitute a known-good TPMS control unit (see page 18-83), and recheck.
Low tire pressure indicator does not go off, and no DTCs are stored
1. Turn the ignition switch to LOCK (0).
2. Disconnect the TPMS control unit 20P connector.
3. Turn the ignition switch to ON (II).
4. Check the low tire pressure indicator for several seconds when the ignition switch is turned ON (II).
Did the indicator come on, and then go off? YES
-Check for loose terminals and poor connections at the TPMS control unit. If necessary, substitute a known-good TPMS control unit (see page 18-83), and recheck.
NO
-Do the troubleshooting for the gauge control module (see page 22-332). If necessary, substitute a known-good gauge control module (see page 22-351), and recheck.
TPMS indicator does not come on, and no DTCs are stored
1 . Turn the ignition switch to LOCK (0).
2. Disconnect the TPMS control unit 20P connector.
3. Turn the ignition switch to ON (II).
4. Check the TPMS indicator for several seconds when the ignition switch is turned ON (II).
Did the indicator come on? YES
-Check for loose terminals and poor connections at the TPMS control unit. If necessary, substitute a known-good TPMS control unit (see page 18-83), and recheck.
NO
-Do the troubleshooting for the gauge control module (see page 22-332). If necessary, substitute a known-good gauge control module (see page 22-351), and recheck.
TPMS indicator does not go off, and no DTCs are stored
NOTE: - Check for gauge DTCs with the HDS (see page 22-3). If multiple DTCs are present, including U0029, troubleshoot those DTCs first. If only DTC U0029 is present, continue with the following troubleshooting.
- If the TPMS control unit was replaced, the TPMS indicator will be on until all four sensor ID codes are learned.
1. Turn the ignition switch to ON (II).
2. Check the TPMS indicator for several seconds when the ignition switch is turned to ON (II).
Did the indicator come on and then go off? YES
-The system is OK at this time.
NO
-Go to step 3.
3. Turn the ignition switch to LOCK (0).
4. Check the No. 29 (7.5 A) fuse in the driver's under-dash fuse/relay box.
Is the fuse blown? YES
-Go to step 5.
NO
-Reinstall the checked fuse, then go to step 7.
5. Disconnect the TPMS control unit 20P connector.
6. With the No. 29 (7.5 A) fuse removed, check for continuity between body ground and TPMS control unit 20P connector terminal No. 10.
TPMS CONTROL UNIT 20P CONNECTOR
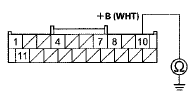
Wire side of female terminals
Is there continuity? YES
-Repair a short to body ground in the wire between the No. 29 (7.5 A) fuse in the driver's under-dash fuse/relay box and the TPMS control unit.
NO-
lnstall a new No. 29 (7.5 A) fuse in the driver's under-dash fuse/relay box, then go to step 10.
7. Check the No. 5 (7.5 A) fuse in the driver's under-dash fuse/relay box.
Is the fuse blown? YES
-Go to step 8.
NO
-Reinstall the fuse, then go to step 13.
8. Disconnect the TPMS control unit 20P connector.
9. With the No. 5 (7.5 A) fuse removed, check for continuity between body ground and TPMS control unit 20P connector terminal No. 8.
TPMS CONTROL UNIT 20P CONNECTOR
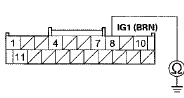
Wire side of female terminals
Is there continuity? YES
-Repair a short to body ground in the wire between the No. 5 (7.5 A) fuse in the driver's under-dash fuse/relay box and the TPMS control unit.
NO
-lnstall a new No. 5 (7.5 A) fuse in the driver's under-dash fuse/relay box, then go to step 10.
15. Turn the ignition switch to ON (II).
16. Measure the voltage between body ground and TPMS control unit 20P connector terminal No. 8.
TPMS CONTROL UNIT 20P CONNECTOR
Wire side of female terminals
Is there battery voltage? YES
-Go to step 17.
NO
-Repair an open in the wire between the TPMS control unit and the No. 5 (7.5 A) fuse in the driver's under-dash fuse/relay box.
17. Turn the ignition switch to LOCK (0).
18. Reconnect the TPMS control unit 20P connector.
19. Turn the ignition switch to ON (II).
20. Measure the voltage between body ground and TPMS control unit 20P connectorterminal No. 4.
TPMS CONTROL UNIT 20P CONNECTOR

Wire side of female terminals
Is there 0.1 Vor more? YES
-Repair an open or high resistance in the wire between the TPMS control unit and body ground (G503).
NO
-Do the troubleshooting for the gauge control module (see page 22-332). If the gauge control module is OK, check for loose terminals and poor connections at the TPMS control unit. If necessary, substitute a known-good TPMS control unit (see page 18-83), and recheck.
 DTC Troubleshooting
DTC 11,13,15,17: Tire Low Air Pressure
NOTE: If low tire pressure is detected, the TPMS control
unit sets one or more of these DTCs, and turns on the
low tire pressure indicator. If the low tire pr ...
 TPMS Control Unit Replacement
NOTE: Make sure the TPMS control unit mounting
bracket is not bent or twisted as this may affect its
communication with the tire pressure sensors.
1. Turn the ignition switch to LOCK (0).
2. R ...
See also:
Countershaft Disassembly, Inspection,
and Reassembly
1. Inspect the needle bearings for galling and rough movement.
2. Inspect the splines for excessive wear and damage.
3. Check the shaft bearing surface for scoring and excessive wear.
4. Lubr ...
Ball Joint Boot Inspection / Replacemen
Special Tools Required
- Clip Guide, 45 mm 070AG-SJA0300
-Clip Guide, 41 mm 07974-SA50700
1. Check the ball joint boot for weakness, damage,
cracks, and grease leaks.
NOTE:
- If the ball joint ...
Front Inner Fender Replacement
NOTE:
- Put on gloves to protect your hands.
- Take care not to scratch the body.
- When prying with a flat-tip screwdriver, wrap it with protective tape to
prevent damage.
1. Remove the f ...