 Honda Accord: Front Inner Fender Replacement
NOTE: - Put on gloves to protect your hands.
- Take care not to scratch the body.
- When prying with a flat-tip screwdriver, wrap it with protective tape to prevent damage.
1. Remove the front wheel.
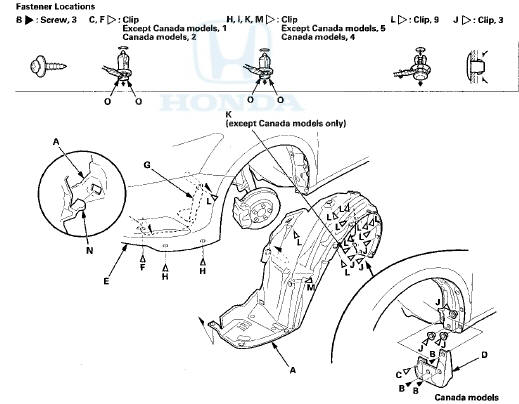
2. Remove the front inner fender (A).
-1. Canada models: On the back of the wheel arch, remove the screws (B) and the clip (C), and remove the front splash guard (D).
-2. From under the front bumper (E), detach the clip (F) securing the front bumper, the splash shield (G), and the front inner fender, and detach the clips (H) securing the front bumper and the inner fender.
-3. From the wheel arch, detach the clips (I, J , K, L) that secure the front inner fender (and the splash shield) to the body.
-4. From the wheel arch, detach the clip (M) that secure the front inner fender to the resonator chamber (left side) or the body (right side).
-5. Release the hook (N) of the splash shield, then remove the front inner fender.
NOTE: To release the clip C, F, H, I, K, M, pry up on the center pin at the notch ( 0 ).
3. Install the inner fender in the reverse order of removal, and note these items: - If the clips are damaged or stress-whitened, replace them with new ones.
- Push the clips and the hook into place securely.
 Fenderwell
...
 Front Splash Shield Replacement
NOTE:
- Put on gloves to protect your hands.
- Take care not to scratch the body.
- When prying with a flat-tip screwdriver, wrap it with protective tape to
prevent damage.
- 4-door is sho ...
See also:
Using HFL
HFL Buttons
HFL Talk button - Press and release to give a command or answer
a call.
HFL Back button - Press and
release to end a call, go back to the
previous command, or cancel the
comman ...
Airbag Care
You do not need to, and should not, perform any maintenance on or replace any
airbag system components yourself. However, you should have your vehicle
inspected by a dealer in the following situat ...
Trunk Lower Trim Replacement
4-door
NOTE:
- Put on gloves to protect your hands.
- Take care not to scratch the trunk lid.
1. Remove the license plate from the trunk lid.
2. Remove the clips fastening the trunk lower t ...