 Honda Accord: Sunshade Replacement
1. Remove the drain channel (see page 20-94).
2. Slide the sunshade (A) until you can see both sunshade slider spacers (B).
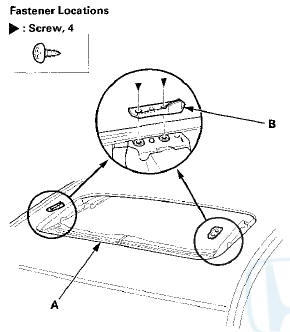
3. Remove the screws, then remove both sunshade slider spacers.
4. While lifting the front area of the sunshade (A), move the sunshade forward until you can see both sunshade rear hooks (B). Do not damage the sunshade or the hooks.
5. Remove the screws, then remove both hooks.
6. Remove the sunshade (A).
7. Remove both front sunshade base sliders (A) and both rear sunshade base sliders (B).
8. Install the sunshade in the reverse order of removal, and check the glass position adjustment (see page 20-91).
9. Check for water leaks (see step 9 on page 20-57). Let the water run freely from a hose without a nozzle. Do not use a high-pressure spray.
 Drain Channel Replacement
1. Remove the moonroof glass (see page 20-91).
2. On both sides, slide the glass brackets (A) with the
moonroof switch to the position where the moonroof
normally tilts up and disconnect the drai ...
 Motor Replacement
NOTE: Put on gloves to protect your hands.
1. Remove the headliner (see page 20-140).
2. Disconnect the connector (A), and remove the screws,
then remove the motor (B).
3. Install the motor ...
See also:
Review of the 2023 Mercedes-Benz C300: Setting the Standard in Small Luxury Sedans?
In a market Mercedes-Benz maintains its commitment to its sedan lineup, extending from the prestigious S-Class to the more accessible C-Class. Despite its entry-level status within the range, the W2 ...
Power Window Master Switch
Replacement
4-door
1. Carefully remove the power window master switch
(A).
2. Disconnect the 37P connector (B) from the power
window master switch, and the 13P connector (C)
from the power mirror switch (D ...
Engine Coolant
This coolant is premixed with 50% antifreeze and 50% water. Do not add any
straight antifreeze or water.
We recommend you check the engine coolant level every time you refuel. Check
the
reser ...