 Honda Accord: Rear Door Glass Outer Weatherstrip
Replacement
Honda Accord: Rear Door Glass Outer Weatherstrip
Replacement
4-door
NOTE: - Put on gloves to protect your hands.
- Take care not to scratch the door.
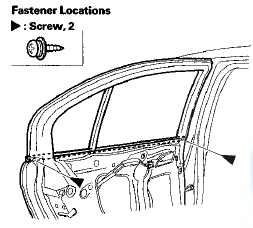
1. Remove these items: - Door panel {see page 20-38) - Plastic cover, as needed (see step 3 on page 20-42) 2. Remove the screws from the front and rear edges of the door.
3. From the Inside of the door, slide the clips (A) of the door glass outer weatherstrip (B) to release the hooks (C) from the flanges (D) of the door.
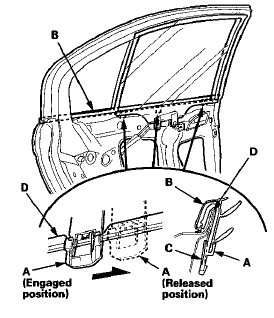
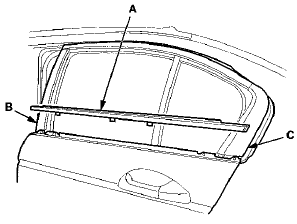
4. Pull u p the door glass outer weatherstrip (A) while passing the front and rear edges of the weatherstrip over the door sash outer trim (B) and the door outer molding (C), then remove the weatherstrip.
5. Before installing the door glass outer weatherstrip, slide the clips to the released position as in step 3.
6. Install the door glass outer weatherstrip, and slide the clips securely on to the flanges.
7. Reinstall all remaining removed parts and note these items: - Make sure the plastic cover on the door is installed properly and sealed around its outside perimeter to seal out water.
- Check for water leaks (see step 9 on page 20-57).
 Rear Door Sash Outer Trim
Replacement
Rear Door Sash Outer Trim
Replacement
4-door
NOTE: Take care not to scratch the door.
1. Remove the door outer molding (see page 20-54).
2. Pull up the door sash outer trim (A) to release the trim
from the clips, and release the t ...
 Rear Door Outer Molding
Replacement
Rear Door Outer Molding
Replacement
Special Tools Required
KTC Trim Tool Set SOJATP2014*
- Available through the Honda Tool and Equipment
Program; call 888-424-6857
4-door
N O T E :
- If you remove the door outer molding, replace ...
See also:
Transmitter Test
NOTE:
• If the doors unlock or lock with the
transmitter, but the
LED on the transmitter does not come on, the LED is
faulty; replace the transmitter.
• If any door is open, you cann ...
Hood Adjustment
1. Remove these Items:
- Front grille cover:
- 2-door (see page 20-274)
- 4-door (see page 20-274)
- Cowl covers (see page 20-278)
- Hood latch cover, 4-door (see step 2 on page 20-302)
2. Sligh ...
Cf Under Head Cover Mmmmm
1. Remove the strut brace (if equipped) (see page
20-306).
2. Remove the engine cover.
3. Remove the four ignition coils (see page 4-20).
4. Remove the dipstick (A), and the power steering ( ...