 Honda Accord: Front Fender Trim Replacement
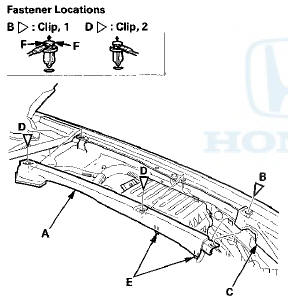
2-door
NOTE: - Take care not to scratch the front grille cover or the body.
- When prying with a flat-tip screwdriver, wrap it with protective tape to prevent damage.
- The left side is shown; the right side is similar.
1. Remove the front fender trim (A).
-1. Detach the clip (B) from the front grille cover (C).
-2. Detach the clips (D) securing the trim.
-3. Pull up the trim to release the projections (E) from the holes in the body, and pull out the trim from under the front grille cover.
NOTE: To release the clip B, pry up on the center pin at the notch (F).
2. Install the trim in the reverse order of removal, and note these items: - If the clips are damaged or stress-whitened, replace them with new ones.
- Push the clips into place securely.
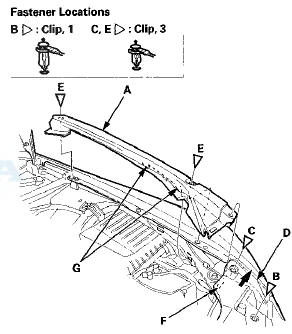
4-door
NOTE: - Take care not to scratch the front grille cover or the body.
- When prying with a flat-tip screwdriver, wrap it with protective tape to prevent damage.
- The left side is shown; the right side is similar.
1 Remove the front fender trim (A).
-1. Detach the clips (B, C) from the front grille cover (D).
-2. Detach the clips (E) securing the trim.
-3. Pull up the front grille cover to release the hook (F) from the front fender cover.
-4. Pull up the trim to release the projections (G) from the holes in the body.
2. Install the trim in the reverse order of removal, and note these items: - If the clips are damaged or stress-whitened, replace them with new ones.
- Push the clips and the hook into place securely.
 Front Grille Replacement
Special Tools Required
KTC Trim Tool Set SOJATP2014*
* Available through the Honda Tool and
Equipment
Program; call 888-424-6857
Grille Replacement - 2-door
NOTE:
- Take care not to scratch th ...
 Cowl Cover Replacement
Special Tools Required
KTC Trim Tool Set SOJATP2014*
*Available through the Honda Tool and
Equipment
Program; call 888-424-6857
Cowl Cover Replacement
NOTE:
- Put on gloves to protect your han ...
See also:
Protecting Small Children
Child Seat Type
Many states, Canadian provinces and
territories allow a child one year of
age or older who also meets the
minimum size and weight
requirements to transition from a
rear-fa ...
Lane Departure Warning (LDW)*
Alerts you when the system detects a possibility of your vehicle
unintentionally
crossing over left or right side lane markings.
• How the System Works
If your vehicle is getting too close t ...
Receiving a Call
When you receive a call, an incoming
call notification (if activated) will
play and interrupt the audio system
if it is on.
Press the HFL Talk button to answer
the call, or the HFL Back butto ...