 Honda Accord: Front Grille Replacement
Special Tools Required
KTC Trim Tool Set SOJATP2014*
* Available through the Honda Tool and Equipment Program; call 888-424-6857
Grille Replacement - 2-door
NOTE: - Take care not to scratch the front bumper, - When prying with a flat-tip screwdriver, wrap it with protective tape to prevent damage.
1. Remove the front bumper (see page 20-255).
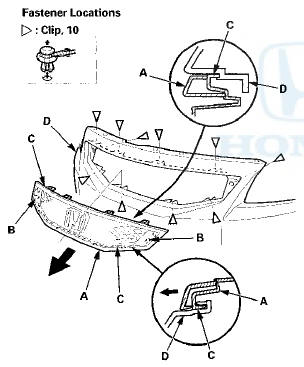
2. Remove the front grille (A).
-1. Detach the clips.
-2. Release the hooks (B) and the ribs (C) from the front bumper (D).
3. Install the grille in the reverse order of removal, and note these items: - If the clips are damaged or stress-whitened, replace them with new ones.
- Push the clips and the hooks into place securely.
Grille Replacement - 4-door
NOTE: - Take care not to scratch the front bumper or the body.
When prying with a flat-tip screwdriver, wrap it with protective tape to prevent damage.
1. Remove the front grille cover (see page 20-274).
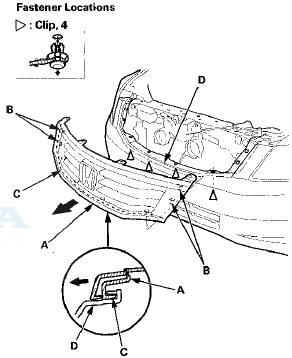
2. Remove the front grille (A).
-1. Detach the clips.
-2. Release the hooks (B) and the ribs (C) from the front bumper (D).
3. Install the grille in the reverse order of removal, and note these items: - If the clips are damaged or stress-whitened, replace . them with new ones.
- Push the clips and the hooks into place securely.
Molding Replacement - 2-door
NOTE; - Take care not to scratch the front grille.
- When prying with a flat-tip screwdriver, wrap it with protective tape to prevent damage.
1. Remove the front grille.
2. Remove the screws, and release the two hooks (A) with a flat-tip screwdriver, then remove the front grille molding (B) from the front grille base (C).
3. Install the molding in the reverse order of removal, and push the hooks into place securely.
Molding Replacement - 4-door
NOTE: - Take care not to scratch the front grille.
- When prying with a flat-tip screwdriver, wrap it with protective tape to prevent damage.
1. Remove the front grille.
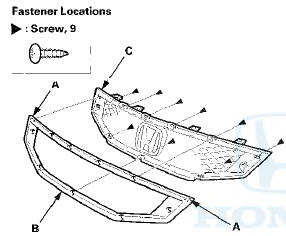
2. Remove the screw, and release the hooks (22 places) (A) with a flat-tip screwdriver, then remove the front grille molding (B) from the front grille base (C).
3. Install the molding in the reverse order of removal, and push the hooks into place securely.
 Front Grille Cover Replacement
2-door
NOTE:
- Take care not to scratch the front grille or the body.
- When prying with a flat-tip screwdriver, wrap it with
protective tape to prevent damage.
1. Remove the front grille cov ...
 Front Fender Trim Replacement
2-door
NOTE:
- Take care not to scratch the front grille cover or the
body.
- When prying with a flat-tip screwdriver, wrap it with
protective tape to prevent damage.
- The left side is show ...
See also:
Introduction
One of the best ways to enhance the enjoyment of your new vehicle is to
read this manual. In it, you will learn how to operate its driving controls and
convenience items. Afterwards, keep this own ...
General Information
Before programming your
HomeLink to operate a garage door
opener, confirm that the opener has
an external entrapment protection
system, such as an ‘‘electronic eye,’’
or other safety ...
Inspecting and Changing Fuses
1. Turn the ignition switch to LOCK
. Turn
headlights and all accessories off.
2. Remove the fuse box cover.
3. Check the large fuse in the engine
compartment.
- If the fuse is blow ...