 Honda Accord: Drain Channel Slider and Cable
Assembly Replacement
Honda Accord: Drain Channel Slider and Cable
Assembly Replacement
NOTE: Put on gloves to protect your hands.
1. Remove these items: .
- Headliner (see page 20-140) - Moonroof glass (see page 20-91) 2. Remove the frame (see page 20-97).
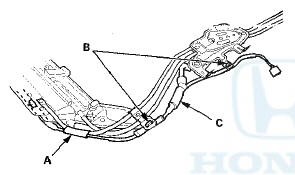
3. Remove these parts from the frame: - Sunshade (see page 20-95) - Moonroof motor (see page 20-96) 4. Remove the aluminum tape (A). 4-door: Detach the clips ( B ) securing the moonroof subharness ( C ) .
4-door is: shown; 2-door is similar. ...
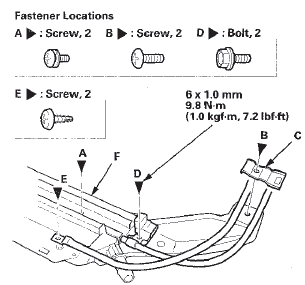
5. Remove the screws (A, B ) securing the cable tube rear : brackets (C). Remove the cable tube side bracket mounting bolts (D) and the cable tube mounting screws (E) from both sides of the frame (F). 4-door is shown; 2-door is similar.
6. Turn both cable tube side brackets ( A ) up to release the hooks ( B ) from the holes in both sides of the frame.
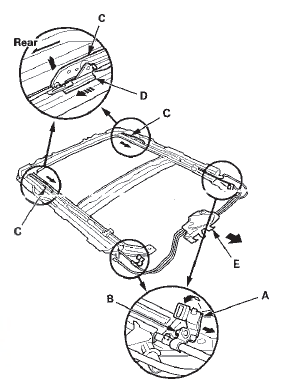
7. Pivot the glass brackets (C) down by sliding the link lifters (D) back, then slide both glass brackets back with the link lifters.
8. Slide the cable assembly (E) half-way back.
9. Remove the drain channel sliders (A) from both sides.

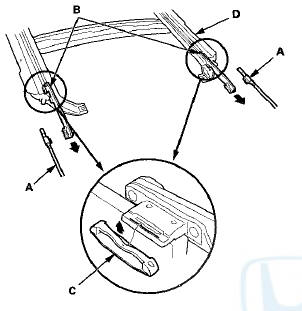
10. Slide the cable assembly (A) and both glass brackets (B) back, remove the deflector sliders (C) from both brackets, then remove them from the frame (D).
11. Install the drain channel slider and cable assembly in the reverse order of removal, and note these items: - Damaged parts should be replaced.
- Apply multipurpose grease to the glass brackets (A) and the guide rail area of the frame (B) indicated by the arrows.
- Before reinstalling the motor, make sure both link lifters are parallel, and in the tilt-up position.
- Before reinstalling the motor, install the frame and the glass, then check the opening drag (see page 20-102).
- After reinstalling the motor, reset the moonroof control unit (see page 22-371).

 Frame and Drain Tube Replacement
SRS components are located in this area. Review the
SRS component locations, 2-door (see page 24-23),
4-door (see page 24-21) and the precautions and
procedures (see page 24-25) before doing repair ...
 Closing Force and Opening Drag
Check
Closing Force and Opening Drag
Check
1. Remove the headliner (see page 20-140).
2. Closing force check:
- Cover the leading edge of the glass (A) with a shop
towel (B), and attach a spring scale (C) as shown.
- Have an assistant ...
See also:
Component Location Index
With navigation system
...
Roof Molding Replacement
Special Tools Required
KTC Trim Tool S e t SOJATP2014*
* Available through the Honda Tool and
Equipment
Program; call 888-424-6857
Molding Replacement
NOTE:
- Put on gloves to protect your han ...
Ball Joint Removal
Special Tools Required
- Ball Joint Thread Protector, 14 mm 07AAE-SJAA100
- Ball Joint Thread Protector, 12 mm 07AAF-SDAA100
- Ball Joint Thread Protector, 10 mm 07AAF-SECA120
- Ball Joint Remover ...