 Honda Accord: Crossover Network Control Unit
Removal/Installation
Honda Accord: Crossover Network Control Unit
Removal/Installation
Driver's Door Speaker Crossover Network Control Unit
1. Remove the driver's dashboard lower cover (see page 20-166).
2. Disconnect the connector (A), then remove the driver's door speaker crossover network control unit (B).
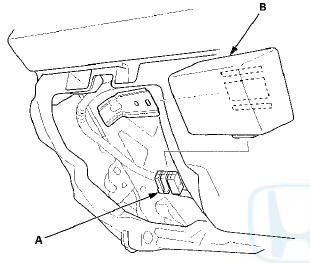
3. install the driver's door speaker crossover network control unit in the reverse order of removal.
Front Passenger's Door Speaker Crossover Network Control Unit
1. Remove the center console panel (see page 20-157), then remove the audio pocket (see page 20-168).
2. Disconnect the connector (A), then remove the passenger's door speaker crossover network control unit (B).
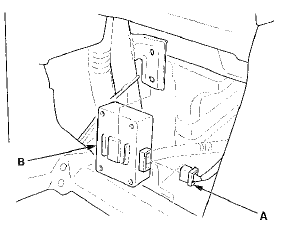
3. Install the passenger's door speaker crossover network control unit in the reverse order of removal.
 Active Noise Cancellation
Microphone
Removal/Installation
Active Noise Cancellation
Microphone
Removal/Installation
Front
1. Remove the roof console (see page 20-140), and
disconnect the connector (A) from the front active
noise cancellation microphone (B).
2. Remove the screws and the front active noise
can ...
 Speaker Test/Replacement
Front Door Speaker
1. Remove the door panel.
• 4-door (see page 20-17)
• 2-door (see page 20-12)
2. Remove t h e bolt (A). Then lift the speaker straight up
to release t h e lower cli ...
See also:
Refilling Window Washer Fluid
Check the amount of window washer fluid by looking at the reservoir.
If the level is low, fill the washer reservoir.
If the washer fluid is low, the washer level
indicator comes on.
Pour the ...
Recommended Engine Oil
Oil is a major contributor to your
engine’s performance and longevity.
Always use a premium-grade 0W-20
detergent oil displaying the API
Certification Seal. This seal indicates
the oil is e ...
Ground Distribution
Ground to Components Index
* 1 : EX-L, EX-L PZEV
*2: Except EX-L, EX-L PZEV
*3: With premium audio system
*4: With navigation system
*5: '10 model
*6: '08-09 models ...