 Honda Accord: Inboard Joint Side
1. Wrap the splines with on the driveshaft vinyl tape (A) to prevent damaging the inboard boot.
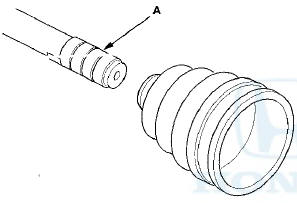
2. Install the inboard boot onto the driveshaft, then remove the vinyl tape. Be careful not to damage the inboard boot.
3. Install the spider (A) onto the driveshaft by aligning the marks (B) you made on the spider and the end of the driveshaft.
4. Install a new circlip (C) into the driveshaft groove.
Always rotate the circlip in its groove to make sure it is fully seated.
5. Fit the rollers (A) onto the spider (B) as shown, and note these items: -Reinstall the rollers in their original positions on the spider by aligning the marks (C) you made.
-Hold the driveshaft pointed up to prevent the rollers from falling off.
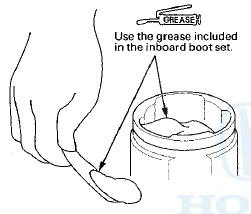
6. Pack the inboard joint with the joint grease included in the new inboard boot set.
Grease quantity Inboard joint:

7 Fit the inboard joint onto the driveshaft, and note these items: -Reinstall the inboard joint onto the driveshaft by aligning the marks (A) you made on the inboard joint and the rollers.
-Hold the driveshaft so the inboard joint is pointing up to prevent it from falling off.
8. Fit the boot ends (A) onto the driveshaft (B) and the inboard joint (C).
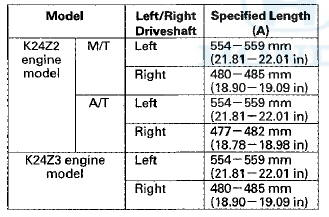
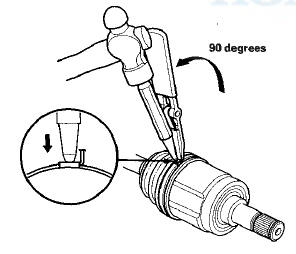
9. Adjust the length (A) of the driveshafts to the figure as shown, then adjust the boots to halfway between full compression and full extension. Bleed excess air from the boots by inserting a flat-tipped screwdriver between the boot and the joint
Left driveshaft
light driveshaft

10. Install new boot bands.
-For the double loop type, go to step 11.
-For the low profile type, go to step 20.
11. Fit the boot ends onto the driveshaft and the inboard joint, then install a new double loop band (A) onto the boot (B).
NOTE: Pass the end of the double loop band through the clip (C) twice in the direction of the forward rotation of the driveshaft.

12. Pull up the slack in the band by hand.
13. Mark a line (A) on the band 1 0 - 1 4 mm (0.4-0.6 in) from the clip (B).

14. Thread the free end of the band through the nose section of the commercially available boot band tool (KD-3191 or equivalent) (A), and into the slot on the winding mandrel (B).
15. Using a wrench on the winding mandrel of the boot band tool, tighten the band until the marked line (C) on the band meets the edge of the clip.
16. Lift up the boot band tool to bend the free end of the band 90 degrees to the clip. Center-punch the clip, then fold over the remaining tail onto the clip.
17. Unwind the boot band tool, and cut off the excess free end of the band to leave a 5—10 mm (0.2—0.4 in) tail protruding from the clip.
18. Bend the band end (A) by tapping it down using a hammer.
NOTE: -Make sure the band and the clip do not interfere with anything on the vehicle, and the band does not move.
-Clean any grease remaining on the surrounding surfaces.

19. Repeat steps 11 through 18 for the band on the other end of the boot.
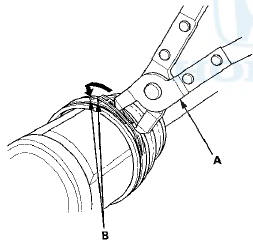
20. Install a new low profile band (A) onto the boot (B), then hook the tab (C) of the band.
21. Close the hook portion of the band using commercially available boot band pliers (A), then hook the tabs (B) of the band.
22. Install the boot band on the other end of the boot, and repeat steps 20 and 21.
 Driveshaft Reassembly
Exploded View
Special Tools Required
-Boot Band Tool KD-3191 or equivalent, commercially
available
•Seal Clamp Tool Kent-Moore J-35910 or
equivalent,
commercially available
-Boot Band P ...
 Outboard Joint Side
1. Wrap the splines on the driveshaft with vinyl tape (A)
to prevent damaging the outboard boot.
2. Install new ear clamp bands (B) and the outboard boot
onto the driveshaft, then remove the viny ...
See also:
Changing the Set Speed
You can increase the set cruising
speed in any of these ways:
Press and hold the RES/ACCEL
button. When you reach the
desired cruising speed, release the
button.
Push on the accelerator peda ...
To Play an iPod
This audio system can operate the
audio files on the iPod with the
same controls used for the in-dash
disc changer. To play an iPod,
connect it to the USB adapter cable
in the console compar ...