
 Honda Accord: Outboard Joint Side
1. Wrap the splines on the driveshaft with vinyl tape (A) to prevent damaging the outboard boot.
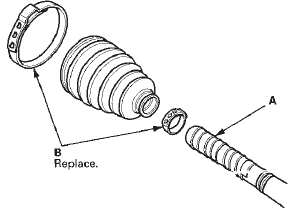
2. Install new ear clamp bands (B) and the outboard boot onto the driveshaft, then remove the vinyl tape. Be careful not to damage the outboard boot.
3. Make sure to check the size of a new stop ring.

To avoid driveshaft and vehicle damage, make sure you install a new stop ring.
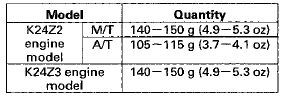
Stop ring specifications
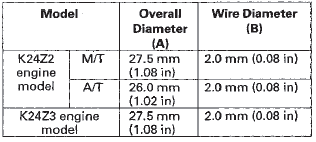
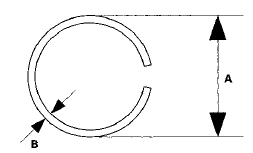
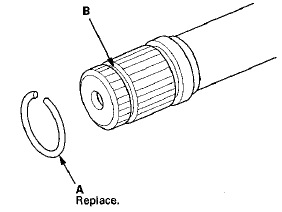
4. Install the stop ring (A) into the driveshaft groove (B).
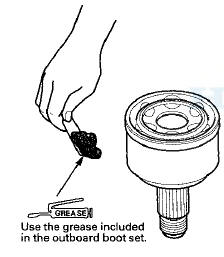
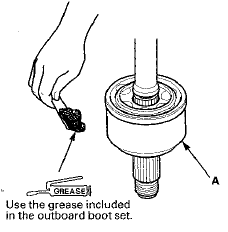
5. Pack about 35 g (1.2 oz) of grease included in the new outboard boot set into the driveshaft hole in the outboard joint.
NOTE* If you are installing a new outboard joint, the grease is already installed.
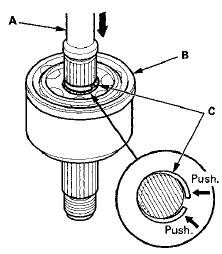
6. Insert the driveshaft (A) into the outboard joint (B) until the stop ring (C) is close to the joint.
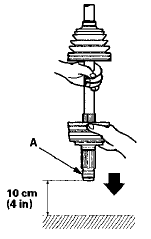
7. To completely seat the outboard joint, pick up the driveshaft and the joint, and tap or hit the assembly onto a hard surface from a height of about 10 cm (4 in).
NOTE: Do not use a hammer, as excessive force may damage the driveshaft. Be careful not to damage the threaded section (A) of the outboard joint.
8. Check the alignment of the paint mark (A) you made with the outboard joint end (B).

To avoid driveshaft and vehicle damage, the shaft must be all the way into the outboard joint to ensure the stop ring is properly seated.
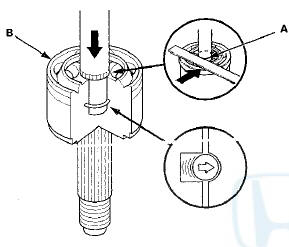
9. Pack the outboard joint (A) with the remaining joint grease included in the outboard boot set
Total grease quantity
Outboard pint:
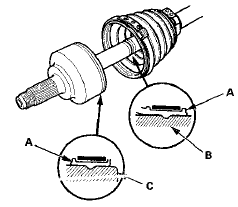
10. Fit the boot ends (A) onto the driveshaft (B) and the outboard joint (C). Bleed any excess air from the boot by inserting a flat-tipped screwdriver between the boot and the joint.
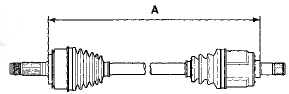
11. Inspect the length (A) of the driveshafts to the figure as shown, then adjust the boots to halfway between full compression and full extension.
Left driveshaft
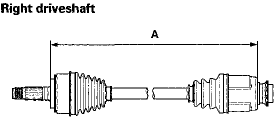
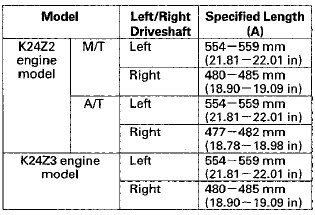
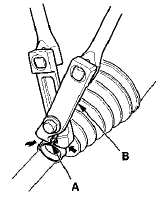
12. Close the ear portion (A) of the band using a commercially available seal clamp tool (Kent-Moore J-35910 or equivalent) (B).
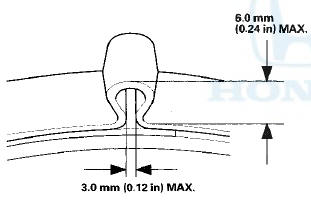
13. Check the clearance between the closed ear portion of the band. If the clearance is not within the standard, close the ear portion of the band tighter.
14. Repeat steps 12 and 13 for the band on the other end of the boot.
 Inboard Joint Side
1. Wrap the splines with on the driveshaft vinyl tape (A)
to prevent damaging the inboard boot.
2. Install the inboard boot onto the driveshaft, then
remove the vinyl tape. Be careful not to dama ...
 Driveshaft Installation
NOTE: Before starting Installation, make sure the mating
surfaces of the joint and the splined section are clean.
1 Apply about 5 g (0.18 oz) of moly 60 paste
(P/N 08734-0001) to the contact area ...
See also:
Transmission Fluid Inspection and Replacement
1. Raise the vehicle on a lift, and make sure it is securely
supported.
2. Remove the front splash shield (see page 20-291).
3. Remove the oil filler plug (A) and the sealing washer
(B), check ...
Recirculation Control Motor Test
'08-09 models 4-door with A/T and "10 model
with A/T
NOTE: Before testing the motor, check for HVAC DTCs
(see page 21-9).
1. Disconnect the 7P connector from the recirculation
control moto ...
Making a Call
You can make calls using any phone
number or a name in the HFL
phonebook. You can also redial the
last number called.
Bluetooth is the wireless technology
that links your phone to HFL. HFL
...