 Honda Accord: Center Display Visor
Removal / Installation
Honda Accord: Center Display Visor
Removal / Installation
Special Tools Required
KTC Trim Tool Set SOJATP2014*
*Available through the Honda Tool and Equipment Program; call 888-424-6857
Without Navigation System
NOTE: - Take care not to scratch the dashboard or the related parts.
- Use the appropriate tool from the KTC trim tool set to avoid damage when removing components.
1. Remove these items: - Center pocket (see page 20-168) - Driver's inner dashboard trim (see page 20-167) - Passenger's dashboard trim (see page 20-173) - Audio-HVAC module (see page 23-115) 2. Remove the center display visor (A).
-1. Remove the screws.
-2. Pull out the visor to detach the clips.
Special Tools Required
KTC Trim Tool Set SQJATP2014*
* Available through the Honda Tool and Equipment Program; call 888-424-6857
With Navigation System
NOTE: - Take care not to scratch the dashboard or the related parts.
- Use the appropriate tool from the KTC trim tool set to avoid damage when removing components.
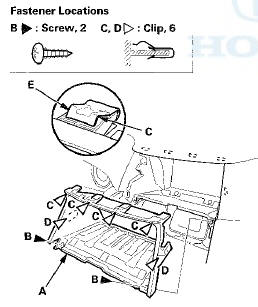
1. Remove the dashboard center vent (see page 20-178) 2. Remove the center display visor (A).
-1. Remove the screws (B).
-2. Pull out the upper edge of the visor to detach the upper clips (C).
-3. Pull out the visor to detach the side clips (D).
NOTE: If the non-woven fabric (E) on the upper clips are damaged, replace them with new ones.
3. Install the cover in the reverse order of removal, and note these items: - If the clips are damaged, replace them with new ones.
- If the upper clip is replaced, attach the new non-woven fabric (A) around new clip (B) as the following procedures.
- After installing new clip to the visor (C), clean the clip and the visor surfaces with a shop towel dampened in isopropyl alcohol. After cleaning, keep oil, grease, and water from getting on the surface.
- Attach the non-woven fabric with adhesive tape around the clip.
- Push the clips into place securely.
Non-woven fabric:
Thickness 0.5 mm (0.02 in)
Width 20 mm (0.79 in)
Length 25 mm (0.98 in)
Non-woven fabric adhesive tape:
Thickness 0.16 mm (0.006 in)
Width 20 mm (0.79 in)
Length 25 mm (0.98 in)
 Dashboard Center Lower Cover
Removal/Installation
Dashboard Center Lower Cover
Removal/Installation
Special Tools Required
KTC Trim Tool Set SOJATP2014*
*Available through the Honda Tool and
Equipment
Program; call 888-424-6857
SRS components are located in this area. Review the
SRS component ...
 Passenger's Dashboard Trim
Removal/Installation
Passenger's Dashboard Trim
Removal/Installation
Special Tools Required
KTC Trim Tool Set SOJATP2014*
* Available through the Honda Tool and
Equipment
Program; call 888-424-6857
NOTE:
- Take care not to scratch the dashboard or the related
p ...
See also:
Stall Speed Test
1. Wake sure the transmission fluid is filled to the proper
level (see page 14-191).
2. Apply the parking brake, and block all four wheels.
3. Connect the HDS to the DLC (A) located under the
...
Low Oil Pressure Indicator Circuit Diagram
...
To Play a USB Flash Memory Device
This audio system can operate the
audio files on a USB flash memory
device with the same controls used
for the in-dash disc changer. To play
a USB flash memory device, connect
it to the USB ...