 Honda Accord: Audio System Basic Operation

To use the audio system function, the power mode must be in ACCESSORY or ON.
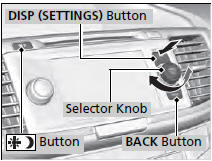
Use the selector knob, DISP and BACK buttons to access some audio functions.
Press  to switch between the
normal and
extended display for some functions.
to switch between the
normal and
extended display for some functions.
Selector knob: Rotate left or right to scroll through the available choices. Press to set your selection.
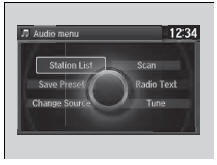
Also press to select any mode. The available mode includes Change Source, Station List, Save Preset, Radio Text, Music Search, and play modes. Play modes can be also selected from Scan, Random/Repeat, and so on.
BACK button: Press to go back to the previous display.
 button: Press to change the
audio/
information screen brightness.
button: Press to change the
audio/
information screen brightness.
Press  once and make an adjustment.
uEach time you press , the mode
switches between the daytime mode,
nighttime mode and OFF mode.
, the mode
switches between the daytime mode,
nighttime mode and OFF mode.
These indications are used to show how to operate the selector knob.
Rotate  to select.
Press  to enter.
- Audio with Touch Screen
- Audio/Information Screen
- Display Setup
- Playing AM/FM Radio
- Playing XM® Radio
- Playing a CD
- Playing an iPod®
- Playing Internet Radio
- Playing a USB Flash Drive
- Playing Bluetooth® Audio
 Playing Bluetooth® Audio
Your audio system allows you to listen to music from your
Bluetooth®-compatible
phone.
This function is available when the phone is paired and connected to the
vehicle's
Bluetooth® HandsFre ...
 Audio with Touch Screen
Use the touch screen to operate the audio system.
• Selecting an Audio Source
Select Source, then select an icon on the source list to switch the
audio source.
• Displaying the Menu Items
...
See also:
APP Sensor Signal I n s p e c t i o n
NOTE:
- This procedure checks the APP sensor in its fully
closed position. In any other position, the APP sensor
stores DTCs which are covered in other
troubleshooting procedures.
- Check for P ...
Bearing Installation
Special Tools Required
-Attachment, 78 x 80 mm 07NAD-PX40100
-Driver Handle, 15 x 135L 07749-0010000
-Bearing Driver Attachment, 42 x 47 07746-0010300
1. Install the bearings in the direction show ...
Status Log
If you suspect there is a immobilizer system problem, check the status log.
1. Connect the HDS to the data link connector.
2. Turn the ignition switch to ON (II).
3. On the HDS screen, at MAI ...