 Honda Accord: Playing XM® Radio
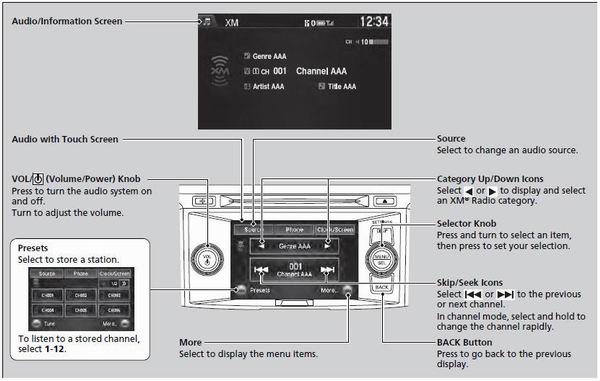
• To Play the XM® Radio
1. Select the XM® mode.

2. Press  to switch to the
Audio menu screen.
to switch to the
Audio menu screen.
3. Rotate  to select XM Tune Mode,
then press
to select XM Tune Mode,
then press  .
.
4. Rotate  to select Channel Mode
or Category Mode, then press
to select Channel Mode
or Category Mode, then press  .
.
5. Rotate  to select Channel List,
then press
to select Channel List,
then press  .
.
6. Rotate  to select a channel from
a list, then press
to select a channel from
a list, then press  .
.

2. Select More.
3. Select Tune Mode.
4. Select CH Channel Mode or CAT Category Mode.
5. Select a channel using the  icons
on the tune mode screen or the
preset numbers (1-12) on the preset mode screen.
icons
on the tune mode screen or the
preset numbers (1-12) on the preset mode screen.
In the channel mode, all available channels are selectable. In the category mode, you can select a channel within a category (Jazz, Rock, Classical, etc.).
There may be instances when XM® Radio does not broadcast all the data fields (artist name, title). This does not indicate a problem with your audio system.
• Preset Memory
To store a station:
1. Tune to the selected station.

2. Press  to switch to the
Audio menu screen.
to switch to the
Audio menu screen.
3. Rotate  to select Save Preset,
then press
to select Save Preset,
then press  .
.
4. Rotate  to select the preset
number you want to store that station, then
press
to select the preset
number you want to store that station, then
press  .
.

2. Select More.
3. Select Save Preset.
4. Select the preset number you want to store that station.
You can store 12 XM® stations into the preset memory.
 Playing AM/FM Radio
• Preset Memory
To store a station:
1. Tune to the selected station.
2. Press to switch to the
Audio menu screen.
3. Rotate to select Save Preset,
then press .
4. Rotate to select ...
 Playing a CD
Your audio system supports audio CDs, CD-Rs and CD-RWs in either MP3, WMA, or
AAC*1 format. With the CD loaded, select the CD mode.
• How to Select a File from the Music Search List
(MP3/WMA/ ...
See also:
Cylinder Head
Component Location Index (cont'd)
Engine Compression Inspection
NOTE: After this inspection, you must reset the engine
control module (ECM)/powertrain control module
(PCM), otherwise the ECM ...
Front Seat Manual Adjustments
See pages for important safety
information and warnings about how to
properly position the seats and seatbacks.
Make all seat adjustments before
you start driving.
To adjust the seat forward ...
Shift Lever Does Not Move
Follow the procedure below if you cannot move the shift lever out of the
position.
• Releasing the Lock
1. Set the parking brake.
2. Remove the key from the ignition switch.
2. Remove ...