 Honda Accord: A/C System Test
Performance Test
• Air conditioning refrigerant or lubricant vapor can irritate your eyes, nose, or throat.
•Be careful when connecting service equipment.
• Do not breathe refrigerant or vapor.
The performance test will help determine if the A/C system is operating within specifications.
NOTE: • If accidental system discharge occurs, ventilate the work area before resuming service.
• Additional health and safety information may be obtained from the refrigerant and lubricant manufacturers.
1. Do the A/C system inspection (see page 21-8), and correct any problem found.
2. Connect an R-134a refrigerant recovery/recycling/charging station to the high-pressure service port and the low-pressure service port, following the equipment manufacturer's instructions.
3. Determine the relative humidity and air temperature.
4. Open the glove box. Remove the damper and the glove box stop on each side, then let the glove box hang down (see page 20-174).
5. Insert a thermometer (A) in the center vent.
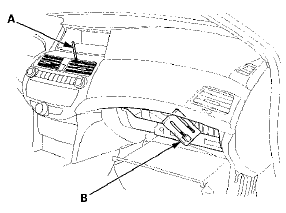
6. Place another thermometer (B) near the blower unit's recirculation inlet duct.
7. Test conditions: • Move the vehicle out of direct sunlight and let it cool down to the surrounding (ambient) temperature. If necessary, wash the vehicle to cool it down more quickly.
• The ambient temperature must be at least 60 °F (16 °C).
• Open hood.
• Open front doors.
• Set the temperature control dial to Max Cool, the mode control switch to Vent, and the recirculation control switch to Recirculate.
• Turn the A/C switch ON and the fan switch to Max.
• Run the engine at 1,500 rpm.
• No driver or passengers in the vehicle.
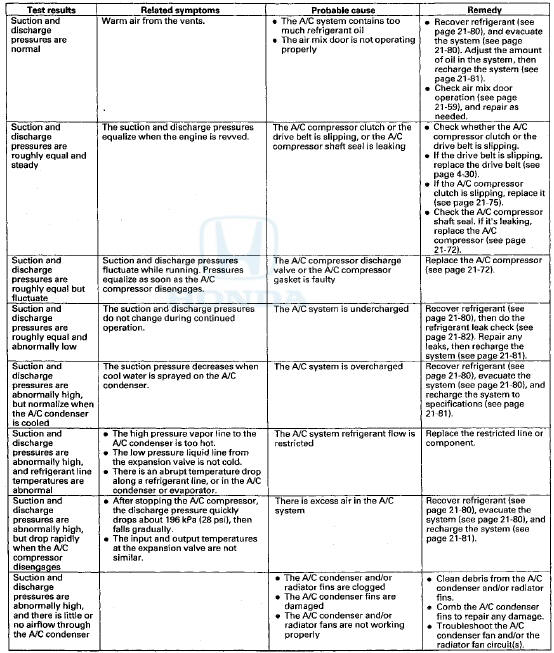
8. Inspect the A/C components for the following conditions: • A/C compressor clutch not engaged.
• Abnormal frost areas.
• Unusual noises.
If you observe any of these conditions, refer to the symptom troubleshooting.
9. After running the air conditioning for 10 minutes under the above test conditions, read the delivery temperature from the thermometer in the center vent, the intake temperature near the blower unit, and the high and low system pressure from the A/C gauges.
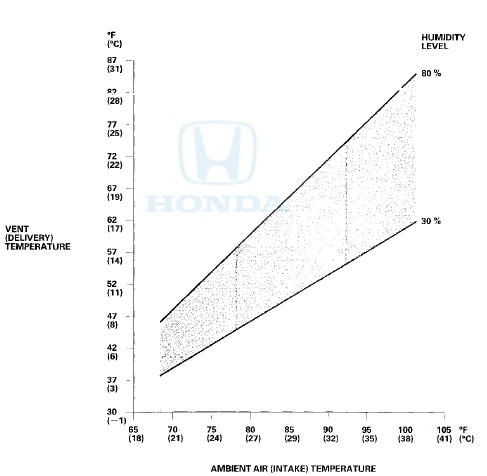
10. To complete the vent (delivery)/ambient air (intake) temperature chart: • Mark the vent (delivery) temperature on the vertical line.
• Mark the ambient air (intake) temperature on the bottom line.
• Draw a vertical line from the ambient air (intake) temperature mark.
• Draw a horizontal line from the vent (delivery) temperature mark until it intersects the vertical line.
NOTE: The vent temperature and the ambient air temperature should intersect in the shaded area. Any measurements outside the area may indicate the need for further inspection.
Ambient Air (Intake) Temperature vs. Vent (Delivery) Temperature
11. To complete the high side (discharge) pressure/ambient air (intake) temperature chart: • Mark the high side (discharge) pressure on the vertical line.
• Mark the ambient air (intake) temperature on the bottom line.
• Draw a vertical line from the ambient air (intake) temperature mark.
• Draw a horizontal line from the high side (discharge) pressure mark until it intersects the vertical line.
NOTE: The high side pressure and the ambient air temperature should intersect in the shaded area. Any measurements outside the area may indicate the need for further inspection.
Ambient Air (Intake) Temperature vs. High Side (Discharge) Pressure

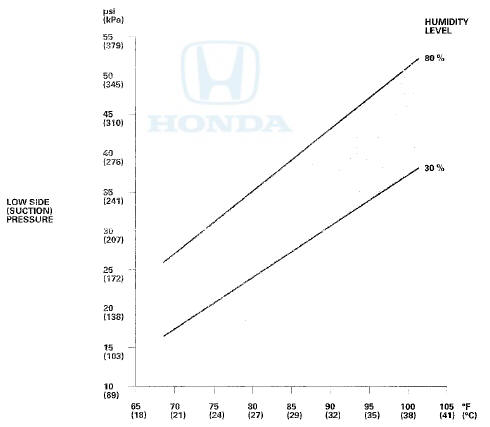
12. To complete the low side (suction) pressure/ambient air (intake) temperature chart: • Mark the low side (suction) pressure along the vertical line.
• Mark the ambient air (intake) temperature along the bottom line.
• Draw a vertical line from the ambient air (intake) temperature mark.
• Draw a horizontal line from the low side (suction) pressure mark until it intersects the vertical line.
NOTE: The low side pressure and the ambient air temperature should intersect in the shaded area. Any measurements outside the area may indicate the need for further inspection.
Ambient Air (Intake) Temperature vs. Low Side (Suction) Pressure
AMBIENT AIR (INTAKE) TEMPERATURE
Pressure Test
 A/C System Noise Check
• Air conditioning refrigerant or lubricant vapor can
irritate your eyes, nose, o r throat.
• Be careful when connecting service equipment.
• Do not breathe refrigerant or vapor. ...
 Climate Control
...
See also:
System Charging
• Air conditioning refrigerant or lubricant vapor can
irritate your eyes, nose, or throat.
• Be careful when connecting service equipment.
• Do not breathe refrigerant or vapor.
...
Automatic Transmission and A/T Differential: (cont'd)
...
Brake Assist System
• Brake Assist System
Designed to assist the driver by generating greater braking force when you
depress
the brake pedal hard during emergency braking.
• Brake assist system operation
Press ...