 Honda Accord: Audio/Information Screen
Displays the audio status and wallpaper. From this screen, you can go to various setup options.
• Switching the Display

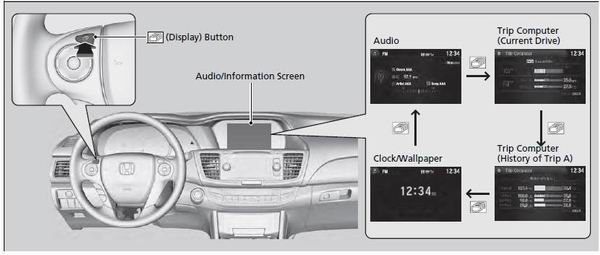

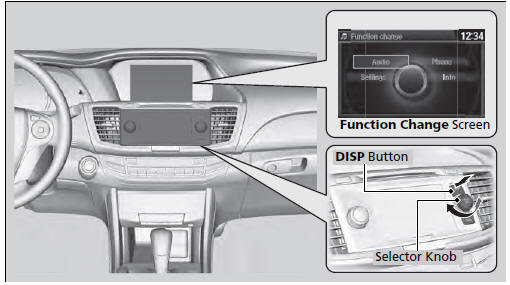
Press the DISP button to go to the Function Change screen.
Rotate  to select Audio, Phone,
Info or Setting and press
to select Audio, Phone,
Info or Setting and press  .
.
• Audio
Shows the current audio information.
• Phone
Shows the HFL information.
• Setting
Enters the customizing menu screen.
• Info
Shows the Trip Computer or Clock/Wallpaper information.
Press  , rotate to select an item,
then press
, rotate to select an item,
then press  .
.
• Trip computer (Current Drive)
Shows the range, and instant and average fuel economy of the current trip, as well as the average fuel economy from your last trip.
• Trip computer (History of Trip A)
Shows the range, average fuel economy and distance traveled for the current trip, as well as the average fuel economy and distances traveled during the last three driving cycles.
Each time you reset the trip meter A, the information on the display updates. The history of the previous three driving cycles is kept.
• Deleting the history manually
1. Press  on the History of
Trip A screen.
on the History of
Trip A screen.
2. Rotate  to select Delete
History, then press
to select Delete
History, then press  .
.
3. You will receive a confirmation message on the screen. Rotate
 to select Yes,
then press
to select Yes,
then press  .
.
• Clock/Wallpaper
Shows a clock screen or an image you import.
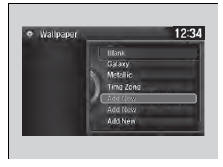
• Wallpaper Setup
You can change, store, and delete the wallpaper on the audio/information screen.
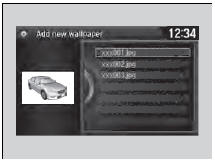
• Import wallpaper
You can import up to three images, one at a time, for wallpaper from a USB flash drive.
1. Connect the USB flash drive to the USB
port.
2. Press and hold the DISP button to go to the
Settings screen.
3. Rotate  to select System
Settings, then
press
to select System
Settings, then
press  .
.
uRepeat the procedure to select Clock,
Clock/Wallpaper Type, then
Wallpaper.
4. Rotate  to select Add New,
then press
to select Add New,
then press  .
.
uThe picture name is displayed on the list.
5. Rotate  to select a desired
picture.
to select a desired
picture.
uThe preview is displayed on the left side
on the screen.
6. Press  to save the data.
uThe confirmation message will appear.
Then the display will return to the wallpaper list.
• When importing wallpaper files, the image must be
in the USB flash drive’s root directory.
Images in a folder cannot be imported.
• The file name must be fewer than 64 characters.
• The file format of the image that can be imported
is BMP (bmp) or JPEG (jpg).
• The individual file size limit is 2 MB.
• The maximum image size is 1,680 x 936 pixels. If
the image size is less than 420 × 234 pixels, the
image is displayed in the middle of the screen with
the extra area appearing in black.
• Up to 255 files can be selected.
• If the USB flash drive does not have any pictures,
the No files detected message appears.
• Select wallpaper
1. Press and hold the DISP button to go to the Settings
screen.
2. Rotate  to select System
Settings, then press
to select System
Settings, then press  .
.
- Repeat the procedure to select Clock/Wallpaper Type, then Wallpaper.
- The screen changes to the wallpaper list.
3. Rotate  to select a desired
wallpaper.
to select a desired
wallpaper.
- The preview is displayed on the left side on the screen.
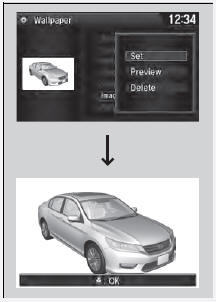
4. Press  .
.
- The pop-up menu appears on the screen.
5. Rotate  to select Set,
then press
to select Set,
then press  .
.
- The display will return to the wallpaper list.
• Delete wallpaper
1. Press and hold the DISP button to go to the Settings
screen.
2. Rotate  to select System
Settings, then press
to select System
Settings, then press  .
.
- Repeat the procedure to select Clock/Wallpaper Type, then Wallpaper
.
- The screen changes to the wallpaper list.
3. Rotate  to select a wallpaper
that you want to delete.
to select a wallpaper
that you want to delete.
- The preview is displayed on the left side on the screen.
4. Press  .
.
- The pop-up menu appears on the screen.
5. Rotate  to select Delete,
then press
to select Delete,
then press  .
.
- The confirmation message will appear.
6. Rotate  to select OK, then
press
to select OK, then
press  to delete completely.
- The display will return to the wallpaper list.
From the pop-up menu, rotate  to
select Preview
and press
to
select Preview
and press  to see a preview at
full-size screen.
to see a preview at
full-size screen.
To go back to the previous screen, press
 to select
OK, or press the BACK button.
to select
OK, or press the BACK button.
When the file size is large, it takes a while to be previewed.
Adjusting the Sound
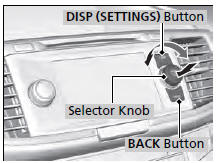
1. Press and hold the DISP button.
2. Rotate  to select Audio
Settings, then
press
to select Audio
Settings, then
press  .
.
3. Rotate to select Sound, then press
 .
.

Rotate  to scroll through the
following
choices:
to scroll through the
following
choices:
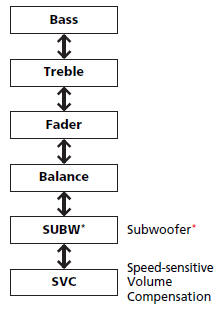
The SVC has four modes: Off, Low, Mid, and High.
SVC adjusts the volume level based on the vehicle speed. As you go faster, audio volume increases. As you slow down, audio volume decreases.
 Audio with Touch Screen
Use the touch screen to operate the audio system.
• Selecting an Audio Source
Select Source, then select an icon on the source list to switch the
audio source.
• Displaying the Menu Items
...
 Display Setup
You can change the brightness or color theme of the audio/information screen.
• Changing the Screen Brightness
1. Press and hold the DISP button to go to the
Settings screen.
2. Rotate to s ...
See also:
Symptom Troubleshooting Index
...
Inspection and Maintenance
For your safety, perform all listed inspections and maintenance to keep your
vehicle
in good condition. If you become aware of any abnormality (noise, smell,
insufficient
brake fluid, oil resi ...
Shift Lever Does Not Move
Follow the procedure below if you cannot move the shift lever out of the
position.
• Releasing the Lock
1. Set the parking brake.
2. Remove the key from the ignition switch.
2. Remove ...