 Honda Accord: Wiper Blades
Check the condition of the wiper blades at least every six months.
Replace them if you find signs of cracking in the rubber, areas that are getting hard, or if they leave streaks and unwiped areas when used.
To replace a wiper blade:
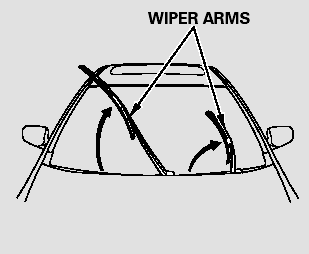
1. Raise the wiper arm off the windshield. Raise the driver’s side first, then the passenger’s side.

Do not open the hood when the wiper arms are raised, or you will damage the hood and wiper arms.
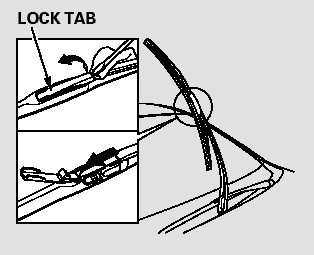
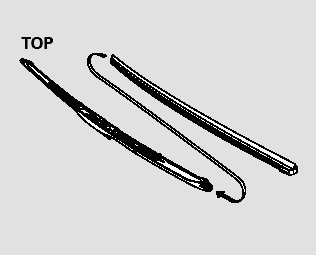
2. Disconnect the blade assembly from the wiper arm:
Put a cloth on the edge of the lock tab to prevent scratches, then push up on the lock tab carefully with a flat-tip screwdriver.

Pivot the blade assembly toward the wiper arm until it releases from the wiper arm.
When replacing a wiper blade, make sure not to drop the wiper blade or wiper arm down on the windshield.
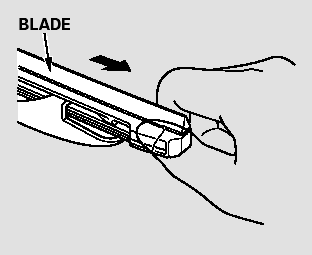
3. Remove the blade from its holder by grabbing the tabbed end of the blade. Pull firmly until the tabs come out of the holder.
4. Examine the new wiper blades. If they have no plastic or metal reinforcement along the back edge, remove the metal reinforcement strips from the old wiper blade, and install them in the slots along the edge of the new blade.
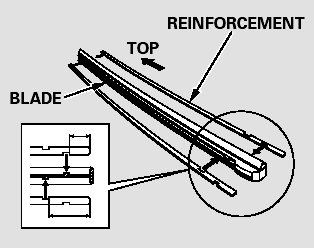
Make sure the two rubber tabs inside the blade fit to each notch of the reinforcement, as shown.
5. Place the top of the wiper blade on the end of the blade assembly, and slide the blade onto the assembly until the tabs are fitted onto the wiper blade.
Make sure the blade is completely installed.
6. Slide the wiper blade assembly onto the wiper arm. Push down the lock tab. Make sure the wiper blade assembly locks in place.
7. Lower the wiper arm down against the windshield, the passenger’s side first, then the driver’s side.
 Dust and Pollen Filter
This filter removes the dust and
pollen that is brought in fromthe
outside through the heating and
cooling system/climate control
system.
Have your dealer replace this filter
when this serv ...
 Tires
Tires
To safely operate your vehicle, your
tires must be the proper type and
size, in good condition with adequate
tread, and correctly inflated.
The following pages give more
detailed information ...
See also:
Pressure Test
Special Tools Required
•A/T Oil Pressure Gauge Set 07406-0020400
or
07406-0020401
•A/T Pressure Hose, 2,210 mm
07MAJ-PY4011A
•A/T Pressure Adapter 07MAJ-PY40120
NOTE:
-Disable ...
Auto Door Locking
The auto door locking feature has
three possible settings:
The auto door locking is
deactivated all the time.
The doors lock whenever you
move the shift lever out of the
Park (P) position (A ...
Fuel Information
• Fuel recommendation
Use of a lower octane gasoline can cause a persistent, heavy metallic
knocking noise
that can lead to engine damage.
• Top tier detergent gasoline
Because the level ...