 Honda Accord: Countershaft Reverse Selector Hub and
3rd Gear Installation
Honda Accord: Countershaft Reverse Selector Hub and
3rd Gear Installation
Special Tools Required
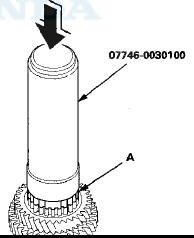
Driver Handle, 40 mm I.D. 07746-0030100
1. Install 2nd gear, 1st gear, 5th gear, and the 37 x 41 x 54.3 mm collar on the countershaft.
2. Slide 3rd gear (A) over the countershaft, and press it in place using the 40 mm driver and a press.

3. Install the 31 mm cotters, the 35 x 47 x 7.8 mm collar, the set ring, the needle bearing, and 4th gear.
4. Slide the reverse selector hub (A) over the countershaft, then press it in place using the 40 mm driver and the press.
NOTE: Some reverse selector hubs are not press-fitted, and can be installed without using the 40 mm driver and a press.
 Countershaft Reverse Selector Hub and
3rd Gear Removal
Countershaft Reverse Selector Hub and
3rd Gear Removal
1. Install a commercially available bearing separator on
4th gear (A). Set the countershaft (B) on a press with a
spacer (C) between the press and the countershaft,
and remove the reverse selector ...
 Secondary Shaft Disassembly,
Inspection, and Reassembly
Secondary Shaft Disassembly,
Inspection, and Reassembly
1. Inspect the thrust needle bearings a n d the needle bearings for g a l l i
n g and rough movement
2. Inspect the splines for excessive wear and damage.
3. Check the shaft bearing surface fo ...
See also:
Transmission Fluid Pressure Switch A
(2nd Clutch) Replacement
1. Remove the intake air duct.
2. Disconnect the connector (A) from the transmission
fluid pressure switch A (2nd clutch) (B), and remove
the transmission fluid pressure switch A (2nd clutch).
...
Transmission Number
Transmission Type
88E5: 5-speed Manual
B90A: 5-speed Automatic
Serial Number
2000001-: B90A
8200001-: 88E5 ...
Special Tools
...