 Honda Accord: Secondary Shaft Disassembly,
Inspection, and Reassembly
Honda Accord: Secondary Shaft Disassembly,
Inspection, and Reassembly
1. Inspect the thrust needle bearings a n d the needle bearings for g a l l i n g and rough movement
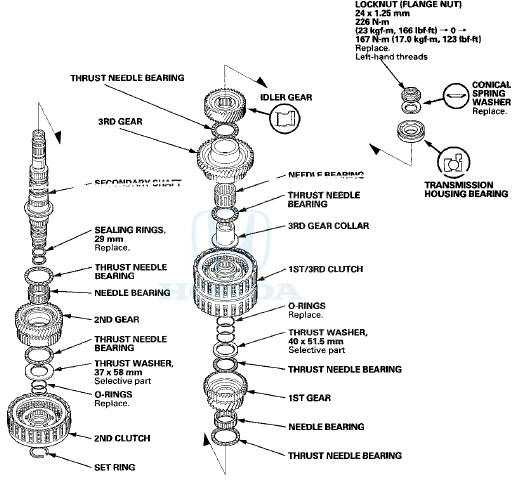
2. Inspect the splines for excessive wear and damage.
3. Check the shaft bearing surface for scoring and excessive wear.
4. Before installing new O-rings, wrap the shaft splines with tape to prevent O-ring damage.
5. Lubricate all parts with ATF during assembly.
6. Install the conical spring washer, and the idler gear in the direction shown.
7. Replace the locknut and the conical spring washer with new ones when assembling the transmission. The locknut has left-hand threads.
8. Check the clearance of 2nd gear (see page 14-294) and 1st gear (see page 14-295).
 Countershaft Reverse Selector Hub and
3rd Gear Installation
Countershaft Reverse Selector Hub and
3rd Gear Installation
Special Tools Required
Driver Handle, 40 mm I.D. 07746-0030100
1. Install 2nd gear, 1st gear, 5th gear, and the
37 x 41 x 54.3 mm collar on the countershaft.
2. Slide 3rd gear (A) over the count ...
 Secondary Shaft Idler Gear Removal
and Installation
Secondary Shaft Idler Gear Removal
and Installation
Special Tools Required
Attachment 42 mm I.D. 07QAD-P0A0100
Removal
Place a spacer (A) on the secondary shaft (B), and set a
puller (C) under the idler gear (D), then remove the idler
gear.
Ins ...
See also:
Fuel Pressure Regulator Replacement
1. Remove the fuel tank unit (see page 11-320).
2. Remove the reservoir (A).
3. Remove the bracket (B).
4. Remove the fuel pressure regulator (C).
5. Install the parts in the reverse order ...
Installing a Child Seat
After selecting a proper child seat
and a good place to install the seat,
there are three main steps in
installing the seat:
1. Properly secure the child seat to
the vehicle. All child seats ...