 Honda Accord: Valve, Spring, and Valve Seal
Removal
Honda Accord: Valve, Spring, and Valve Seal
Removal
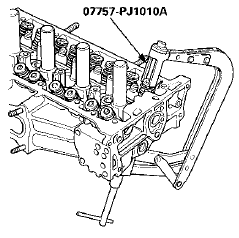
Special Tools Required
Valve Spring Compressor Attachment 07757-PJ1010A
Identify the valves and the valve springs as they are removed so that each item can be reinstalled in its original position.
1. Remove the cylinder head (see page 6-76).
2. Remove the rocker arm assembly (see page 6-81).
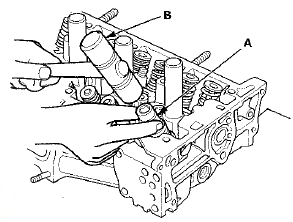
3. Using an appropriate-sized socket (A) and a plastic mallet (B), lightly tap the spring retainer to loosen the valve cotters.
4. Install the valve spring compressor attachment and the valve spring compressor. Compress the spring, and remove the valve cotters.
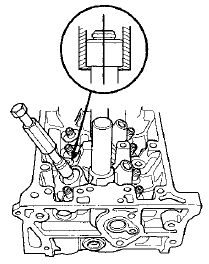
5. Remove the valve spring compressor and the valve spring compressor attachment, then remove the spring retainer, and the valve spring and the valves.
6. Install the valve guide seal remover.
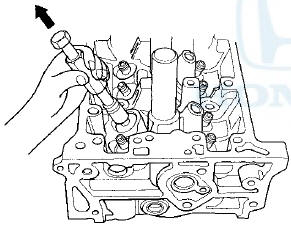
7. Remove the valve seal.
Valve Inspection
1. Remove the valves (see page 6-86).
2. Measure the valve in these areas.
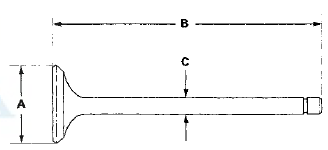
Intake Valve Dimensions
A Standard (New): 35.85-”36.15 mm
(1.411-1.423 in)
B Standard (New): 108.5-109.1 mm
(4.272 -4.295 in)
C Standard (New): 5.475-”5.485 mm
(0.2156-0.2159 in)
C Service Limit: 5.445 mm (0.2144 in)
Exhaust Valve Dimensions
A Standard (New): 30.85-31.15 mm
(1.215-1.226 in)
B Standard (New): 108.4-109.0 mm
(4.268-4.291 in)
C Standard (New): 5.450-5.460 mm
(0.2146-0.2150 in)
C Service Limit: 5.42 mm (0.213 in)
 Camshaft Inspection
NOTE: Do not rotate the camshaft during inspection.
1. Remove the cylinder head (see page 6-76).
2. Disassemble the rocker arm assembly (see page
6-82).
3. Remove the rocker arm assembly (se ...
 Valve Stem-to-Guide Clearance
Inspection
Valve Stem-to-Guide Clearance
Inspection
1. Remove the valves (see page 6-86).
2. Subtract the O.D. of the valve stem, measured with a
micrometer, from the I.D. of the valve guide,
measured with an inside micrometer or a ball gauge.
...
See also:
Battery Test
A battery can explode if you do not follow the proper
procedure, causing seiious injury to anyone nearby.
Follow all procedures carefully and keep sparks and
open flames away from the battery.
R ...
Special Tools
...
Trunk Lower Trim Replacement
4-door
NOTE:
- Put on gloves to protect your hands.
- Take care not to scratch the trunk lid.
1. Remove the license plate from the trunk lid.
2. Remove the clips fastening the trunk lower t ...